TeamZissou
Well-Known Member
The goal of a terra cotta pot hide is to create a humid hide without spraying the substrate. A standard plastic dish washing tub works great for most species, but for species that cannot handle damp substrate (Egyptians, and maybe Chacos) there is little other choice. With the terra cotta pot hide, the humidity can be as high as 90% while the substrate, such as oyster shell for Egyptians, is bone dry.
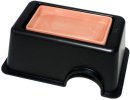
The idea for a terra cotta pot hide with a saucer roof is not new. @Salspi posted a photo of one that he made about four years ago. @PA2019 showed a variation of the idea but used a plastic pot. There are a few options on the market, such as OMEM products on Amazon. The downside of these is that they don’t come in many sizes and are not big enough for tortoises. Here's the OMEM hide that is more geared toward lizards:
I wanted to figure out how to make one of these, but with the brim of the pot pointing downward so that the sides slope downward rather than upward (the opposite of Salspi’s design). The difficulty is determining where to cut the pot so that the saucer sits nicely on top. In this post, I will show an easy way to determine where to cut, how to make the cut, and finish the clay pot hide.
Determining Where to Cut
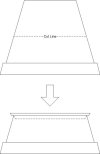
The difficulty with clay pots and saucers is that they come in a variety sizes. There are a few brands of pots, and the wall thickness of different pots may be different. Our goal here is to accurately cut the bottom off a pot such that the saucer sits nicely on top. Here’s a diagram:
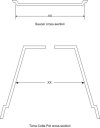
In a cross-sectional view, we need to determine the vertical position of the pot where the inner diameter matches the diameter of the saucer, ie. XX on the saucer needs to match XX inner diameter of the pot. Here’s a visual:
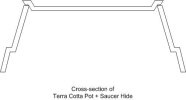
to end up with this:
Step 1: Select a pot and saucer. For the pot demonstrated in this post, I used an 8.25” clay pot made by Pennington from Home Depot, and a 7” diameter Spang saucer from a nursery. Choose a combo of pot and saucer that will roughly give the height of the overall hide pot. This gave me a relatively short hide pot for my new Egyptians.
A note on clay pot brands: I used two brands Pennington (from Home Depot) and Spang (made in Germany, from a local nursery). I found that the Pennington pots cut more easily than the Spang pots. The Spang pots are much higher quality but tended to flake a bit more during the breakthrough cut, but did not crack. Overall, the Spang pot took longer to cut and was tougher on the diamond wheel. I prefer the Spang saucers because they are about 1” deep and will hold more water, requiring refill less often. Spang pots are also made in more colors, such as gray, marble, and off-white, giving some interesting options for the overall look of the enclosure.
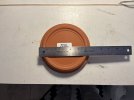
Step 2: Measure the diameter of the saucer. Here’s a photo of the Spang saucer. Measure the XX dimension shown on the diagram above. This corresponds to the point at which the sloped part meets the lip of the saucer. In this case, I got a measurement of around 6.38” for a 7" saucer:
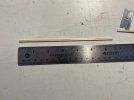
Step 3: The transfer gage. Here’s the critical part, we need to make a transfer gage that lets us figure out the vertical position of the cut. For this, I used a thin piece of balsa wood that I had lying around, that was about 1/8” by 1/16”, and cut it to a length of 6.38”. You could use any long, slender material such as a drinking straw or bamboo skewer etc.:
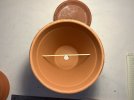
Next, place the transfer gage into the pot so that it sits level. If you wanted to check how level it is, just measure the distance from the bottom of the pot up to the stick:
Taking another piece of the transfer gage material (in my case, balsa wood), position it vertically from TABLE LEVEL up to where the horizontal stick is positioned. This gives us a vertical position at which we will make our cut:
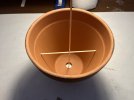
Mark the position where the two sticks cross on the vertical stick:
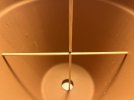
Next, cut the vertical stick at the mark:
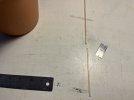
Hold the vertical stick up to the pot (from table level) and mark the pot every inch or so around the circumference:
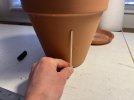
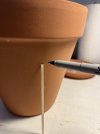
Then, we need to draw a line connecting the marks so that we will know where to cut. For this, I used a hotel key card, which I could bend so that the line was perpendicular to the bottom of the pot:
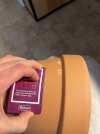
Now we have line that we will follow to cut the pot in half:
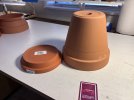
Step 4: Cut the pot along the line. To cut the pot, a Dremel tool with a diamond wheel is the best option. This allows you to cut slowly enough so that the pot does not crack. I have made about six of these and none of them cracked. The downside of the diamond wheel is that they wear out and need to be replaced. I roughly used one wheel per pot. Dremel brand blades can be expensive, so I looked on eBay and found a set of 50 diamond wheels for $10 from China, which worked fine for this project.
Safety note: Overall, this is a loud, messy job. I wear a mask, face shield, and ear plugs when making a cut. The Dremel produces a fine dust during the cutting process since the diamond wheel is grinding the material away. Sometimes, little bits of molten terra cotta fly out of the cut which make the face shield necessary. It takes 20-30 minutes of Dremeling to cut the pot in half, which is a loud job.
First, carefully follow the line around the circumference with the Dremel. Be extra careful on the first pass as you are establishing the straightness of the cut. It’s best to work around the entire circumference rather than trying to break through in a single spot. It can be tempting to hold the Dremel in a single spot and apply a lot of pressure, but all this does is heat up the diamond wheel and cause it to wear out faster.
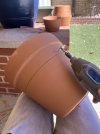
After some time, a deeper groove will form:
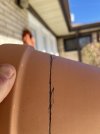
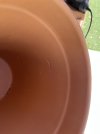
Eventually, the Dremel blade will break through:
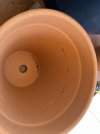
Which will be followed by several more (hopefully) evenly spaced around the circumference:
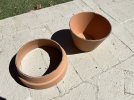
Ultimately, the two pieces will separate. Clean up the sharp edges with the diamond wheel or another Dremel grinding stone bit:
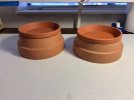
Step 5: Glue the saucer to the pot. I like to glue the saucer to the pot prior to cutting the door so that the ring is reinforced by the saucer. Here’s a test fit of the pot and saucer:
I used PL Premium to glue the saucer to the pot. This is an extremely strong adhesive from Home Depot.
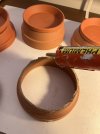
Place the saucer on the ring, and allow the glue to cure for 24 hours:
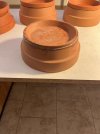
Step 6: Cut the door. Trace out the tortoise door and cut it out using the Dremel and diamond wheel (note, this is a different pot than the other example photos. This pot was a little larger in diameter, and I wanted to use a larger saucer, so the fit of the saucer on the pot is not as nice as the others. If I had done that, the inside would have only been 1-1.5”, which is too short.):
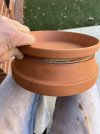
The finished door:
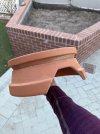
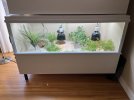
Step 7: Installation. You have the option to let the pots sit on the surface, or to dig them into the substrate a little to create something of a burrow. Here’s a view of the my closed chamber for Egyptians:
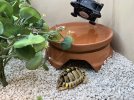
Here’s a pot that’s sitting on top of the substrate:
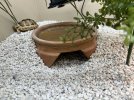
And another that is dug in. The tortoises do have the option to walk up the ramp to the top and get in the water, but I have not seen them do that. If they were to fall out of the dish, I would raise the pot up to ground level. But, they have not entered any of the available water dishes at all.
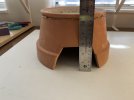
I found that the tortoises preferred these shorter hide pots rather than a much taller pot. When I first got them, they all hid in the taller pot until they discovered the shorter pot. Then, they would all cram into the shorter pot and leave the taller pot uninhabited. My assumption is that they feel more secure in the shorter pot. Since switching to two short pots in the enclosure, the group often splits where they like to spend the night. Here’s a pic of the taller pot that they did not like. I will save it for when they get larger:
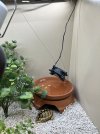
Finally, you probably noticed the computer fans that I have suspended above the saucers. This is to encourage evaporation of the water and raise the humidity in the closed chamber. The humidity in my house is about 30%, and the humidity inside the closed chamber with lights on, but without the fans was a low as 25%. With the fans blowing on the water saucers 24/7, I can maintain about 55-65% humidity during the day and 75% at night when the lights are off, but a CHE maintains about 75 F so that limits how high the humidity can go. It would probably get up into the 85% range without it. The humidity inside the hide is 80-90%, and this is great since the tortoises spend most their time there. I only received the tortoises about two months ago, and they were kept dry by the breeder, but I hope to limit pyramiding going forward. Ultimately if I am lucky enough to breed them one day, I will use the same humid hides for hatchlings in an effort to achieve smooth Egyptians.
The fan is suspended from a hook in the ceiling and is secured with bailing wire:
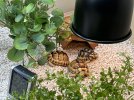
Here, the tortoises emerge in the morning to bask:
Overall, I am happy with these clay pot humid hides.
Pros:
Anyway, I figured it would be worth documenting how to make these, in case someone wants to do it in the future.
The idea for a terra cotta pot hide with a saucer roof is not new. @Salspi posted a photo of one that he made about four years ago. @PA2019 showed a variation of the idea but used a plastic pot. There are a few options on the market, such as OMEM products on Amazon. The downside of these is that they don’t come in many sizes and are not big enough for tortoises. Here's the OMEM hide that is more geared toward lizards:

I wanted to figure out how to make one of these, but with the brim of the pot pointing downward so that the sides slope downward rather than upward (the opposite of Salspi’s design). The difficulty is determining where to cut the pot so that the saucer sits nicely on top. In this post, I will show an easy way to determine where to cut, how to make the cut, and finish the clay pot hide.
Determining Where to Cut
The difficulty with clay pots and saucers is that they come in a variety sizes. There are a few brands of pots, and the wall thickness of different pots may be different. Our goal here is to accurately cut the bottom off a pot such that the saucer sits nicely on top. Here’s a diagram:

In a cross-sectional view, we need to determine the vertical position of the pot where the inner diameter matches the diameter of the saucer, ie. XX on the saucer needs to match XX inner diameter of the pot. Here’s a visual:

to end up with this:

Step 1: Select a pot and saucer. For the pot demonstrated in this post, I used an 8.25” clay pot made by Pennington from Home Depot, and a 7” diameter Spang saucer from a nursery. Choose a combo of pot and saucer that will roughly give the height of the overall hide pot. This gave me a relatively short hide pot for my new Egyptians.
A note on clay pot brands: I used two brands Pennington (from Home Depot) and Spang (made in Germany, from a local nursery). I found that the Pennington pots cut more easily than the Spang pots. The Spang pots are much higher quality but tended to flake a bit more during the breakthrough cut, but did not crack. Overall, the Spang pot took longer to cut and was tougher on the diamond wheel. I prefer the Spang saucers because they are about 1” deep and will hold more water, requiring refill less often. Spang pots are also made in more colors, such as gray, marble, and off-white, giving some interesting options for the overall look of the enclosure.
Step 2: Measure the diameter of the saucer. Here’s a photo of the Spang saucer. Measure the XX dimension shown on the diagram above. This corresponds to the point at which the sloped part meets the lip of the saucer. In this case, I got a measurement of around 6.38” for a 7" saucer:

Step 3: The transfer gage. Here’s the critical part, we need to make a transfer gage that lets us figure out the vertical position of the cut. For this, I used a thin piece of balsa wood that I had lying around, that was about 1/8” by 1/16”, and cut it to a length of 6.38”. You could use any long, slender material such as a drinking straw or bamboo skewer etc.:

Next, place the transfer gage into the pot so that it sits level. If you wanted to check how level it is, just measure the distance from the bottom of the pot up to the stick:

Taking another piece of the transfer gage material (in my case, balsa wood), position it vertically from TABLE LEVEL up to where the horizontal stick is positioned. This gives us a vertical position at which we will make our cut:

Mark the position where the two sticks cross on the vertical stick:

Next, cut the vertical stick at the mark:

Hold the vertical stick up to the pot (from table level) and mark the pot every inch or so around the circumference:


Then, we need to draw a line connecting the marks so that we will know where to cut. For this, I used a hotel key card, which I could bend so that the line was perpendicular to the bottom of the pot:

Now we have line that we will follow to cut the pot in half:

Step 4: Cut the pot along the line. To cut the pot, a Dremel tool with a diamond wheel is the best option. This allows you to cut slowly enough so that the pot does not crack. I have made about six of these and none of them cracked. The downside of the diamond wheel is that they wear out and need to be replaced. I roughly used one wheel per pot. Dremel brand blades can be expensive, so I looked on eBay and found a set of 50 diamond wheels for $10 from China, which worked fine for this project.
Safety note: Overall, this is a loud, messy job. I wear a mask, face shield, and ear plugs when making a cut. The Dremel produces a fine dust during the cutting process since the diamond wheel is grinding the material away. Sometimes, little bits of molten terra cotta fly out of the cut which make the face shield necessary. It takes 20-30 minutes of Dremeling to cut the pot in half, which is a loud job.
First, carefully follow the line around the circumference with the Dremel. Be extra careful on the first pass as you are establishing the straightness of the cut. It’s best to work around the entire circumference rather than trying to break through in a single spot. It can be tempting to hold the Dremel in a single spot and apply a lot of pressure, but all this does is heat up the diamond wheel and cause it to wear out faster.

After some time, a deeper groove will form:

Eventually, the Dremel blade will break through:

Which will be followed by several more (hopefully) evenly spaced around the circumference:

Ultimately, the two pieces will separate. Clean up the sharp edges with the diamond wheel or another Dremel grinding stone bit:

Step 5: Glue the saucer to the pot. I like to glue the saucer to the pot prior to cutting the door so that the ring is reinforced by the saucer. Here’s a test fit of the pot and saucer:

I used PL Premium to glue the saucer to the pot. This is an extremely strong adhesive from Home Depot.

Place the saucer on the ring, and allow the glue to cure for 24 hours:

Step 6: Cut the door. Trace out the tortoise door and cut it out using the Dremel and diamond wheel (note, this is a different pot than the other example photos. This pot was a little larger in diameter, and I wanted to use a larger saucer, so the fit of the saucer on the pot is not as nice as the others. If I had done that, the inside would have only been 1-1.5”, which is too short.):

The finished door:

Step 7: Installation. You have the option to let the pots sit on the surface, or to dig them into the substrate a little to create something of a burrow. Here’s a view of the my closed chamber for Egyptians:

Here’s a pot that’s sitting on top of the substrate:

And another that is dug in. The tortoises do have the option to walk up the ramp to the top and get in the water, but I have not seen them do that. If they were to fall out of the dish, I would raise the pot up to ground level. But, they have not entered any of the available water dishes at all.

I found that the tortoises preferred these shorter hide pots rather than a much taller pot. When I first got them, they all hid in the taller pot until they discovered the shorter pot. Then, they would all cram into the shorter pot and leave the taller pot uninhabited. My assumption is that they feel more secure in the shorter pot. Since switching to two short pots in the enclosure, the group often splits where they like to spend the night. Here’s a pic of the taller pot that they did not like. I will save it for when they get larger:

Finally, you probably noticed the computer fans that I have suspended above the saucers. This is to encourage evaporation of the water and raise the humidity in the closed chamber. The humidity in my house is about 30%, and the humidity inside the closed chamber with lights on, but without the fans was a low as 25%. With the fans blowing on the water saucers 24/7, I can maintain about 55-65% humidity during the day and 75% at night when the lights are off, but a CHE maintains about 75 F so that limits how high the humidity can go. It would probably get up into the 85% range without it. The humidity inside the hide is 80-90%, and this is great since the tortoises spend most their time there. I only received the tortoises about two months ago, and they were kept dry by the breeder, but I hope to limit pyramiding going forward. Ultimately if I am lucky enough to breed them one day, I will use the same humid hides for hatchlings in an effort to achieve smooth Egyptians.
The fan is suspended from a hook in the ceiling and is secured with bailing wire:

Here, the tortoises emerge in the morning to bask:

Overall, I am happy with these clay pot humid hides.
Pros:
- They look nice
- Allow 80-90% humidity in the hide without the need for spraying the substrate
- Paired with computer fans, the humidity in the rest of the enclosure can be in the 50-60% range even with lots of lights on
- They take a long time to make, about 40-60 minutes of Dremeling for each pot
- The process is messy and loud
Anyway, I figured it would be worth documenting how to make these, in case someone wants to do it in the future.
Last edited: