Nice job.
You are using an out of date browser. It may not display this or other websites correctly.
You should upgrade or use an alternative browser.
You should upgrade or use an alternative browser.
My Best Night Box Design Yet
- Thread starter Tom
- Start date
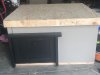
Here is our night box, built as close to Tom's design as I could make it. The mat on the bottom was given to us with Timmi. We have the thermostat set to 85 and during the day it gets to that but in the early morning its usually about 74. The side with the mat would obviously be warmer. I've looked but haven't been able to find how warm should it be? Also, how close should the RHP be to the top of her shell?
Your box looks great! The one thing I see that is conspicuously absent, and would allow your heat to escape, is weatherstripping around the top. I'll net that if you put that in, your night temps will stay warmer. I use this type: https://www.homedepot.com/p/Frost-K...r-Strip-Tape-Cushioned-Ribbed-V27WA/100166568
To install it, you'll need to detach your lid hinges, rest the lid on top of the weather stripping, and then reattach the hinges. This will allow for the extra height of the weatherstripping. If you attach the weather stripping and don't change the hinge mounting height, it will smash the stripping in the back, push it out of the way, and leave a small gap in the front at the same time. Ask me how I know this...
I like the boxes to be 80 in spring and fall when we have warm days, but cold nights. 86 in winter, and I set it to 70 or unplug the heaters when our summer days are near 100 everyday.
The distance you have your RHP set seems great to me. Use a thermometer to check the temp at tortoise shell height at night while the heater is running. You can set a digital thermometer that records highs and lows on a stack of bricks under the RHP, or make a little platform of some sort or other.
Try letting your thermostat probe dangle a few inches lower and see if that changes your night temps too.
Lift the probe up about halfway up the wall so the tortoise doesn't get tangled in it. The probe should be somewhere far from the heater.I’m using the mini heater that you posted on here. I have it hooked to the Jumpstart that I have set at 80 degrees. So should I move the Jumpstart temp higher? I have the same thermometer you posted here. I have the heater knob turned all the way high. The probe for the jumpstart is on the ground.
The number you see on the Jumpstart unit is a good place to start, but use your thermometer readings to adjust it up or down. 80 on the unit might only be 74 in reality. Bump the unit up to 86 and then see what your thermometer says. I had one unit that needed to be set at 90 on the dial in order to maintain 80 in the box. I had another thermostat that needed to be set at 76-77 to maintain 80.
Always pondering
New Member
Your box looks great! The one thing I see that is conspicuously absent, and would allow your heat to escape, is weatherstripping around the top. I'll net that if you put that in, your night temps will stay warmer. I use this type: https://www.homedepot.com/p/Frost-K...r-Strip-Tape-Cushioned-Ribbed-V27WA/100166568
To install it, you'll need to detach your lid hinges, rest the lid on top of the weather stripping, and then reattach the hinges. This will allow for the extra height of the weatherstripping. If you attach the weather stripping and don't change the hinge mounting height, it will smash the stripping in the back, push it out of the way, and leave a small gap in the front at the same time. Ask me how I know this...
I like the boxes to be 80 in spring and fall when we have warm days, but cold nights. 86 in winter, and I set it to 70 or unplug the heaters when our summer days are near 100 everyday.
The distance you have your RHP set seems great to me. Use a thermometer to check the temp at tortoise shell height at night while the heater is running. You can set a digital thermometer that records highs and lows on a stack of bricks under the RHP, or make a little platform of some sort or other.
Try letting your thermostat probe dangle a few inches lower and see if that changes your night temps too.
Thank you, Tom. I thought that foam stuff would work but I can see how much better the weatherstripping you use is. I'll be getting some tomorrow. We'll also be getting a digital thermometer in there tomorrow near the rhp.
Thanks again,
Rich
Maidens Hill Farm
Member
I am about to adopt a 4yo Male Sulcata! This is exactly what I have been searching for on the forum. Thanks! Quick question, from a newbie... If they like moisture and burrowing, is there any benefit to leaving some of the floor in this winter enclosure open to loose soil with mulch over it (thinking they want to burrow in something), or will that lose all the heat through the hole? Also, Im in VA, where it's cold now..do I leave the front open in the day for him to go out in his pin even if its cold? Do the flaps keep it warm enough inside?
Nice.After much thought about what worked and what I wanted to improve over previous attempts, here is the latest version with a step by step pictorial on how I did it. It is time for my 2010 South African herd to move outside. They are moving into a 16x20' completely closed in enclosure. The enclosure is a wooden frame enclosed top to bottom with welded wire. It has a wire roof and the wire extends 18" down into the ground. The actual night box is 4x8x2'. I found a mini oil-filled heater to heat it with. The heater is on a thermostat and will be set to 80 for about half of the year and 70 over the warmer months.
Here is the lid. You can see the insulation in place.

Here is the plywood cover going over the insulation in the lid. The lid fits on top of the box and is hinged. There will be weatherstripping all around the top and the lip on the lid keeps the rain out of the box. You can see a finished lid for a second box in the background.

Here is the bottom. Notice the door notch and how that will fit in later.

Insulation in the bottom. All the insulation is 1.5" thick and has the shiny mylar foil side pointing to the outside. Don't know if that matters much, but thats how I did it.

Insulation on the floor all covered up.

Here the front and back are attached. Notice the door taking shape. Since 9 animals will initially share this, and as they get older they will get bigger, I went kinda big with the door at 26x16". This way one of them won't be able to sit in the doorway and block all the others in or out, and later, when they reach adult size, they will easily fit in and out of this door.

Another view of the front with the sides going up.

Here the side wall insulation is in place and about to be covered up. This box is also double caulked to keep out any cold drafts on those below freezing winter nights. The only air movement will be from the door, or when I open the lid.

All buttoned up.

Here goes the front insulation.

The front insulation is all covered up here. The 2x4 blocks there will support a 2x10" water tub holding shelf. Having containers of water inside will keep the humidity up in the night box, and act as a bit of a heat sink. This technique has been working very well in my underground sulcata night box.

Here's a top view showing the area where the heater will live, the weather stripping in place, the door flaps, and the 2x4 in the back that the lid hinges attach to.

Here is the front with paint and door flaps and water shelves in place.

Here is the door. I will carve out the dirt where the door/ramp hits the ground so it sits flush. One "weak" spot of previous designs was the simple plywood door. I went to great time and trouble to super insulate my night boxes, but then just used thin plywood to cover the door holes. This time the door shares the same 1.5" insulation as the rest of the box. Door open:

Door Closed:

Here you can see the heater installed, the metal heat shield above it, the water tubs for humidity on the shelves, and my purple shoe box that holds all my electrical stuff.

Here are some of the babies enjoying their bermuda grass bedding.

Here is a wide view showing some of the enclosure. The empty wooden box in the lower right foreground of the pic is their 4x8' shade table/planter box. I will be filling it and planting leopard tortoise food in their in the next few days.

One more view of the same thing from the other side.

Well that's it. Tell me what you think.")
Are you still using the De'Longhi oil radiator in there? I've been shopping around for them and keep getting reviews about the "smells" that come off various models/brands. So looking for a good review from you as to what you have used/liked. Thanks
I've used several different brands and types. All work well and all smell funny when you first plug them in. I run them for 20-30 minutes outside two or three times, and let them warm up and cool off a few times before using them in my boxes. This breaks them in, lets me be sure they are working properly and gets rid of that "new heater" smell.Are you still using the De'Longhi oil radiator in there? I've been shopping around for them and keep getting reviews about the "smells" that come off various models/brands. So looking for a good review from you as to what you have used/liked. Thanks
How wide should my door be?
Also, will 4x4 be big enough for our single leopard?
How wide should my door be?
For a regular leopard I'd make the door 14-16" wide and 12-14" tall.
4x4 is plenty big enough for one leopard. Here is how I build and heat those:
https://tortoiseforum.org/threads/another-night-box-thread.88966/
- Joined
- Jun 12, 2015
- Messages
- 55
@Tom
Holy cow building that door is a booger! Think I’ve got it done. It fits so tight I need to put a handle on it to be able to open the door for her. Wondering if you put the weather stripping on the box and the lid or just on one side... and what about the tortoise door. Do you put the weather stripping on that too???
Holy cow building that door is a booger! Think I’ve got it done. It fits so tight I need to put a handle on it to be able to open the door for her. Wondering if you put the weather stripping on the box and the lid or just on one side... and what about the tortoise door. Do you put the weather stripping on that too???
For the doorway, I let the 2x4 framing jut into the door way about 1/4". Then when I cut the door out of the front and inside plywood panels, I save those two pieces and make my for out of them. Doing it this way makes a perfect fit every time. I usually plane about 1/16 of an inch around all four sides of the door just for a little clearance.@Tom
Holy cow building that door is a booger! Think I’ve got it done. It fits so tight I need to put a handle on it to be able to open the door for her. Wondering if you put the weather stripping on the box and the lid or just on one side... and what about the tortoise door. Do you put the weather stripping on that too???
I weather strip the whole top. I do not weather strip the door at all.
- Joined
- Jun 12, 2015
- Messages
- 55
Ok thanks. I’ll definitely try that next time. Do you put the shelf in the 4x4? Just trying to figure out where it would go with the rhp that is yet to go in.
Leo1827
New Member
Hi Tom,
Having recently acquired a 20yr old female leopard tort, I am keen to provide her with somewhere warm to sleep and spend cold days in. I was asking Lynn about ideas on how to house my tort adequately outside and she gave me your thread. Your night box looks and sounds like the perfect solution. I have some questions:
1. Would the size you have made, be big enough for my tort? Her she’ll measure 16” from front to back.
If not
2. What dimensions would you recommend?
3. Would someone like me, who has no carpentery skills, be able to make a box like yours.
4. Where did you get your oil heater from?
5. What about UVB lighting. Could a suitable UVB tube light be fitted to the lid or near the top of the box?
Sorry to ask so many questions, but I am concerned that, if I don’t get something sorted for her soon, she is going have health problems due to not being warm enough. I’ve had her for 2 weeks,.
Many thanks
Jacqui
- Joined
- Jun 12, 2015
- Messages
- 55
@Tom i am on the final steps. Painting the top. Then gotta put the weather stripping on , the hinges and the lid supports. Install the rhp and put the shelves in for the water buckets. Getting close! I’m not the greatest carpenter and there are a lot of flaws.... but next time, if I am brave enough to make a 4x8 I won’t make as many mistakes
Attachments
Hi Tom,
Having recently acquired a 20yr old female leopard tort, I am keen to provide her with somewhere warm to sleep and spend cold days in. I was asking Lynn about ideas on how to house my tort adequately outside and she gave me your thread. Your night box looks and sounds like the perfect solution. I have some questions:
1. Would the size you have made, be big enough for my tort? Her she’ll measure 16” from front to back.
If not
2. What dimensions would you recommend?
3. Would someone like me, who has no carpentery skills, be able to make a box like yours.
4. Where did you get your oil heater from?
5. What about UVB lighting. Could a suitable UVB tube light be fitted to the lid or near the top of the box?
Sorry to ask so many questions, but I am concerned that, if I don’t get something sorted for her soon, she is going have health problems due to not being warm enough. I’ve had her for 2 weeks,.
Many thanks
Jacqui
Hi Jacqui.
1. and 2. A 4x4' box will be best for a single adult leopard. Like this: https://tortoiseforum.org/threads/another-night-box-thread.88966/. This style and heating is best because they can get on the heat when they want to warm up, and they can be off the heat, but still in the warm box when they are warm enough.
3. I don't know. I made my first ones with no carpentry skills. The more I didi it, the better I got at it.
4. Walmart.
5. No need for UV for a tortoise that is going to be living outside. Save the UV for your indoor winter enclosure.
Your tortoise needs warm temperatures immediately. This box will work okay in summer, but you'll need to work something else out for winter.
Leo1827
New Member
Hi Tom, thanks for getting back to me and thanks for answering my barrage of questions. I managed to get a 500w oil heater from my local DIY store. Are you saying, I’m gonna have to think of doing something else for my tort for winter? I was thinking if I aimed to build a 6’x4’ Nightbox with corrugated plastic overhanging the lid to keep the rain off, put the oil heater in, as you’ve done in your most recent box, I could keep my tort in it during the winter too. She’d have access to come and go out n the garden as she pleases although, I expect she’d wanna stay inside, in the warm, when it’s really cold and wet.
After much thought about what worked and what I wanted to improve over previous attempts, here is the latest version with a step by step pictorial on how I did it. It is time for my 2010 South African herd to move outside. They are moving into a 16x20' completely closed in enclosure. The enclosure is a wooden frame enclosed top to bottom with welded wire. It has a wire roof and the wire extends 18" down into the ground. The actual night box is 4x8x2'. I found a mini oil-filled heater to heat it with. The heater is on a thermostat and will be set to 80 for about half of the year and 70 over the warmer months.
Here is the lid. You can see the insulation in place.
Here is the plywood cover going over the insulation in the lid. The lid fits on top of the box and is hinged. There will be weatherstripping all around the top and the lip on the lid keeps the rain out of the box. You can see a finished lid for a second box in the background.
Here is the bottom. Notice the door notch and how that will fit in later.
Insulation in the bottom. All the insulation is 1.5" thick and has the shiny mylar foil side pointing to the outside. Don't know if that matters much, but thats how I did it.
Insulation on the floor all covered up.
Here the front and back are attached. Notice the door taking shape. Since 9 animals will initially share this, and as they get older they will get bigger, I went kinda big with the door at 26x16". This way one of them won't be able to sit in the doorway and block all the others in or out, and later, when they reach adult size, they will easily fit in and out of this door.
Another view of the front with the sides going up.
Here the side wall insulation is in place and about to be covered up. This box is also double caulked to keep out any cold drafts on those below freezing winter nights. The only air movement will be from the door, or when I open the lid.
All buttoned up.
Here goes the front insulation.
The front insulation is all covered up here. The 2x4 blocks there will support a 2x10" water tub holding shelf. Having containers of water inside will keep the humidity up in the night box, and act as a bit of a heat sink. This technique has been working very well in my underground sulcata night box.
Here's a top view showing the area where the heater will live, the weather stripping in place, the door flaps, and the 2x4 in the back that the lid hinges attach to.
Here is the front with paint and door flaps and water shelves in place.
Here is the door. I will carve out the dirt where the door/ramp hits the ground so it sits flush. One "weak" spot of previous designs was the simple plywood door. I went to great time and trouble to super insulate my night boxes, but then just used thin plywood to cover the door holes. This time the door shares the same 1.5" insulation as the rest of the box. Door open:
Door Closed:
Here you can see the heater installed, the metal heat shield above it, the water tubs for humidity on the shelves, and my purple shoe box that holds all my electrical stuff.
Here are some of the babies enjoying their bermuda grass bedding.
Here is a wide view showing some of the enclosure. The empty wooden box in the lower right foreground of the pic is their 4x8' shade table/planter box. I will be filling it and planting leopard tortoise food in their in the next few days.
One more view of the same thing from the other side.
Well that's it. Tell me what you think.
Ogh no, it looks like all the photos have vanished! @Tom
Similar threads
- Replies
- 39
- Views
- 41K
- Replies
- 43
- Views
- 29K