Ok @Tom
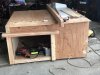
I got the plywood cut. When we got to cutting the bottom piece I added up what you said and it does come out to 42.75 but we cut it to 43. So do we cut the second bottom plywood piece (that goes over the insulation) the same size? My teenager likes to argue
Also, when you cut the 2x4’s for the bottom and leave space for the door we are planning to put it at one side like you did for more floor space. But how far from the side wall do you put the door opening?
")