Building a tortoise enclosure

speedyTortoise

Active Member
Joined
Jun 26, 2023
Messages
126
Location (City and/or State)
North Carolina
Hello! We are thinking about building an indoor enclosure for our Russian tortoise. We are not very "handy" and have never attempted building anything. But our tort is a Russian and needs a lot of space to run around, so it is worth a try. Can I have some information on how to build it, what to use, what not to use, etc? Thank you!

Note: Our tort is 4.5 inches in length and 3 inches in width.
 

wellington

Well-Known Member
Moderator
10 Year Member!
Tortoise Club
Joined
Sep 6, 2011
Messages
49,907
Location (City and/or State)
Chicago, Illinois, USA
As an adult the minimum inside enclosure size should be a 4x8 or larger if possible.
You can use pieces of 4x8 plywood.
There are pop up portable greenhouses that are 3x different lengths you could use.
There are raised garden beds that can work.
 

Clueless Tortoise

Active Member
Joined
Aug 11, 2020
Messages
167
Location (City and/or State)
Raleigh, NC
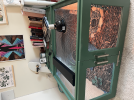
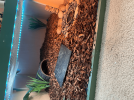
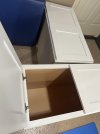
Hi, I actually built an indoor enclosure for my RT myself not too long ago! I went to my local furniture thrift store and bought two horizontal kitchen cabinets for $50 each. For the first cabinet I took the doors off. For the second I used a jigsaw and cut the top of the cabinet out, leaving a hole from above and then cut out a hole in both front doors. I screwed and bolted the two cabinets together, having the cut out cabinet in front of the other. With the cutouts above and in front, I replaced the opening with thick chickenwire (clipping the edges to make sure there were no sharp points sticking out). I put a wooden support beam in the top opening and added handles and a double lock on the front doors (one lock goes down into bottom to stop the doors from moving while the other locks straight across) I stapled a thick painter's tarp down on the bottom where the substrate would go to make it easier when cleaning, and prepped and painted the outside. I used the top opening to place the UVB and heat lamps on top. (I cut a round in the back corner but ended up not using it. I also removed the LED lights in pic below due to not staying/safety) In total it cost me around $150. This was my first attempt and since then I have made modifications (support beam was not shown in pic but added later). His enclosure ended up being a total of 4x8. This is what worked for my current space and my little guy [NOTE: Fir bark (although not the most advised substrate) is used in his enclosure due to our location's high humidity and is able to keep him in the correct % and temp. This is followed up and approved by his exotic vet. Small water bowl & pebbles were only for display purposes, I use (but I had to buy a new) large ceramic planter saucer as water bowl. I hope this helped some, and it does not by any means need to be this fancy, I just end up going wild lol] Best of luck :)
 

Attachments

  • tempImageWwdtz6.jpg
    tempImageWwdtz6.jpg
    1.7 MB · Views: 22
  • tempImageFmtJwO.png
    tempImageFmtJwO.png
    7.2 MB · Views: 22
  • tempImage9PQe8g.png
    tempImage9PQe8g.png
    6.4 MB · Views: 23

speedyTortoise

Active Member
Joined
Jun 26, 2023
Messages
126
Location (City and/or State)
North Carolina
Hi, I actually built an indoor enclosure for my RT myself not too long ago! I went to my local furniture thrift store and bought two horizontal kitchen cabinets for $50 each. For the first cabinet I took the doors off. For the second I used a jigsaw and cut the top of the cabinet out, leaving a hole from above and then cut out a hole in both front doors. I screwed and bolted the two cabinets together, having the cut out cabinet in front of the other. With the cutouts above and in front, I replaced the opening with thick chickenwire (clipping the edges to make sure there were no sharp points sticking out). I put a wooden support beam in the top opening and added handles and a double lock on the front doors (one lock goes down into bottom to stop the doors from moving while the other locks straight across) I stapled a thick painter's tarp down on the bottom where the substrate would go to make it easier when cleaning, and prepped and painted the outside. I used the top opening to place the UVB and heat lamps on top. (I cut a round in the back corner but ended up not using it. I also removed the LED lights in pic below due to not staying/safety) In total it cost me around $150. This was my first attempt and since then I have made modifications (support beam was not shown in pic but added later). His enclosure ended up being a total of 4x8. This is what worked for my current space and my little guy [NOTE: Fir bark (although not the most advised substrate) is used in his enclosure due to our location's high humidity and is able to keep him in the correct % and temp. This is followed up and approved by his exotic vet. Small water bowl & pebbles were only for display purposes, I use (but I had to buy a new) large ceramic planter saucer as water bowl. I hope this helped some, and it does not by any means need to be this fancy, I just end up going wild lol] Best of luck :)
Thank you for the ideas; it certainly helped! I'm thinking about a closet without the doors as a start.
 

speedyTortoise

Active Member
Joined
Jun 26, 2023
Messages
126
Location (City and/or State)
North Carolina
As an adult the minimum inside enclosure size should be a 4x8 or larger if possible.
You can use pieces of 4x8 plywood.
There are pop up portable greenhouses that are 3x different lengths you could use.
There are raised garden beds that can work.
Alright, thank you!
 

New Posts

Top