How to make a closed-chamber baby habitat out of a 55gal Sterilite bin

biochemnerd808

Well-Known Member
10 Year Member!
Joined
Nov 3, 2012
Messages
1,474
Location (City and/or State)
Central Arkansas (we moved!)

Since several folks have asked about how to make a closed chamber baby enclosure out of a 55gal Sterilite tote, here are some pics and description of how I do.

This is not the most beautiful option, but since the babies will only be in here for 9-12 months, I'm okay with that. My own Russian tortoise babies move outside full-time at about 9 months old.
290527489_10224755704257783_4117347825519447116_n.jpg

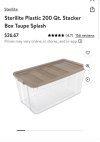
I buy these 55gal (200 quart) Sterilite bins from Target or Home Depot, whichever is cheapest at the time. They cost between $25 -$40, depending on where you buy them and the time of year.

After trying several different kinds of bins, I've found these to work best.


Cutting:
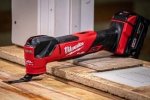
cutter.jpgI use an oscillating cutter with a T blade. A Dremmel with a cutting wheel will work too. Or in a pinch, a wood burner or even just an old knife you repeatedly hold into a hot flame… but whatever you do, use eye protection. Hot plastic bits do fly. Practice on a piece of similar material that you don’t care about.
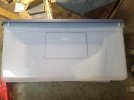


308188137_10225180554198766_7265681733877810619_n.jpg

First, draw a rectangle with sharpie. It should be about 6" or more up from the bottom, to leave enough room for the substrate.

Before you cut out the rectangle, drill 4 holes for the zip tie hinges. (2 holes near the left edge of the rectangle, 2 holes to the left of the line)
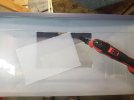


309882610_10225180563398996_1659062899732284896_n.jpg

Cut out the rectangle.


292285306_10224755536973601_8298465960839516900_nn.jpg


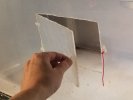
Use zip ties to create the hinges. Optionally, you can also drill 2 small holes on the right side of the door flap to make a 'handle' out of a zip tie.
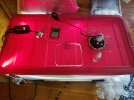


292282676_10224755558214132_904625449674692331_n.jpg

Cut holes for the basking lamp and the CHE (or drill holes to mount the radiant heat panel). Line the edges of the holes with aluminum foil.

I mount a 24" Arcadia T8 UVB Tube light fixture in the back of the lid, which I run for 4 hrs in the afternoon during the winter. During the warm months, my baby tortoises spend 30mins - 1hr outside every day for UV, so I don't use artificial UV light during this time.

This photo shows a door hole on top, too, but I ended up closing it off with tape because I just lost humidity out of it, and I never used it.

You can add additional insulation (though not attractiveness) by taping either silver bubble insulation, or styrofoam insulation boards around 3 sides. I also always set the bin onto a piece of styrofoam. The less heat you lose, the lower wattage bulb you can use.

For information on HEAT and LIGHTS, please refer to the other articles posted here in the forum.

I hope this helps you as you get set up for your baby tortoise!
 

Tom

The Dog Trainer
10 Year Member!
Platinum Tortoise Club
Joined
Jan 9, 2010
Messages
64,675
Location (City and/or State)
Southern California

Since several folks have asked about how to make a closed chamber baby enclosure out of a 55gal Sterilite tote, here are some pics and description of how I do.

This is not the most beautiful option, but since the babies will only be in here for 9-12 months, I'm okay with that. My own Russian tortoise babies move outside full-time at about 9 months old.

View attachment 375362

I buy these 55gal (200 quart) Sterilite bins from Target or Home Depot, whichever is cheapest at the time. They cost between $25 -$40, depending on where you buy them and the time of year.

After trying several different kinds of bins, I've found these to work best.


Cutting:
View attachment 375356I use an oscillating cutter with a T blade. A Dremmel with a cutting wheel will work too. Or in a pinch, a wood burner or even just an old knife you repeatedly hold into a hot flame… but whatever you do, use eye protection. Hot plastic bits do fly. Practice on a piece of similar material that you don’t care about.


View attachment 375357

First, draw a rectangle with sharpie. It should be about 6" or more up from the bottom, to leave enough room for the substrate.

Before you cut out the rectangle, drill 4 holes for the zip tie hinges. (2 holes near the left edge of the rectangle, 2 holes to the left of the line)


View attachment 375358

Cut out the rectangle.


View attachment 375360


Use zip ties to create the hinges. Optionally, you can also drill 2 small holes on the right side of the door flap to make a 'handle' out of a zip tie.


View attachment 375361

Cut holes for the basking lamp and the CHE (or drill holes to mount the radiant heat panel). Line the edges of the holes with aluminum foil.

I mount a 24" Arcadia T8 UVB Tube light fixture in the back of the lid, which I run for 4 hrs in the afternoon during the winter. During the warm months, my baby tortoises spend 30mins - 1hr outside every day for UV, so I don't use artificial UV light during this time.

This photo shows a door hole on top, too, but I ended up closing it off with tape because I just lost humidity out of it, and I never used it.

You can add additional insulation (though not attractiveness) by taping either silver bubble insulation, or styrofoam insulation boards around 3 sides. I also always set the bin onto a piece of styrofoam. The less heat you lose, the lower wattage bulb you can use.

For information on HEAT and LIGHTS, please refer to the other articles posted here in the forum.

I hope this helps you as you get set up for your baby tortoise!
This is fantastic. Every detail engineered for maximum tortoise health. Every potential problem addressed and solved. Yet this is cheap and relatively easy for anyone to do.

One of the problems I've always had with the whole tote thing is that all the heating and lighting interferes with taking the lid on and off every day. What a royal pain. Your little door idea solves that major obstacle.

Can you show us the underside of the top and how you mount the florescent tube?

Great ideas and a great thread. Thanks for sharing this.
 

biochemnerd808

Well-Known Member
10 Year Member!
Joined
Nov 3, 2012
Messages
1,474
Location (City and/or State)
Central Arkansas (we moved!)
This is fantastic. Every detail engineered for maximum tortoise health. Every potential problem addressed and solved. Yet this is cheap and relatively easy for anyone to do.

One of the problems I've always had with the whole tote thing is that all the heating and lighting interferes with taking the lid on and off every day. What a royal pain. Your little door idea solves that major obstacle.

Can you show us the underside of the top and how you mount the florescent tube?

Great ideas and a great thread. Thanks for sharing this.
Sure, I'll take some photos of the lid's underside view and post them in the next days.
 

Tom

The Dog Trainer
10 Year Member!
Platinum Tortoise Club
Joined
Jan 9, 2010
Messages
64,675
Location (City and/or State)
Southern California
Sure, I'll take some photos of the lid's underside view and post them in the next days.
I've got some incoming baby lizards and this would make a fantastic easy-to-build grow out chamber to get them to a larger size. I made something similar years ago with radiant heat panels and a thermostat, but I couldn't figure a good way to add the lights, and access was a pain in the arse, because I had to remove the whole top with the cords attached several times a day.
 

biochemnerd808

Well-Known Member
10 Year Member!
Joined
Nov 3, 2012
Messages
1,474
Location (City and/or State)
Central Arkansas (we moved!)
@Tom, here you go.

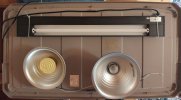
View of the underside of the baby bin lid. Ignore the taped up hole between the bulbs. That used to have a humidifier running through it.

1000035674.jpg

30" T8 UVB with a Euro Range Arcadia 10% desert UV bulb.
25W flood light (40W works too, just raise the fixture accordingly)
50W CHE, with a JumpStart thermostat set to 75°F. It goes over the humid hide. During the summer it's basically off because ambient temp is warm where I have the setup.

The 2 small cables are the thermostat probe and a thermometer probe, fed through a small hole in the lid.
 

biochemnerd808

Well-Known Member
10 Year Member!
Joined
Nov 3, 2012
Messages
1,474
Location (City and/or State)
Central Arkansas (we moved!)
@Tom, here you go.

View of the underside of the baby bin lid. Ignore the taped up hole between the bulbs. That used to have a humidifier running through it.

View attachment 375449

30" T8 UVB with a Euro Range Arcadia 10% desert UV bulb.
25W flood light (40W works too, just raise the fixture accordingly)
50W CHE, with a JumpStart thermostat set to 75°F. It goes over the humid hide. During the summer it's basically off because ambient temp is warm where I have the setup.

The 2 small cables are the thermostat probe and a thermometer probe, fed through a small hole in the lid.
Ps: the T8 fixture is literally zip tied to the lid through 4 holes. Wire works too. I aim for simple and inexpensive, as well as functional.

Some of the folks who got babies from me went a step further and bolted a piece of plywood with hooks to hang the T8.
 

Nrc470

Well-Known Member
5 Year Member
Joined
Jul 13, 2017
Messages
221
Location (City and/or State)
Virginia
This is a great idea. I will be using this for some baby's here come soon. This setup is maximized for tortoise health on the cheap. Thanks for posting this
 

Tortellini0000

New Member
Joined
Aug 8, 2024
Messages
22
Location (City and/or State)
Vancouver bc
@Tom, here you go.

View of the underside of the baby bin lid. Ignore the taped up hole between the bulbs. That used to have a humidifier running through it.

View attachment 375449

30" T8 UVB with a Euro Range Arcadia 10% desert UV bulb.
25W flood light (40W works too, just raise the fixture accordingly)
50W CHE, with a JumpStart thermostat set to 75°F. It goes over the humid hide. During the summer it's basically off because ambient temp is warm where I have the setup.

The 2 small cables are the thermostat probe and a thermometer probe, fed through a small hole in the lid.
Thanks for the visual! Would you also need to include an ambient light to a closed chamber like this for babies?
 

biochemnerd808

Well-Known Member
10 Year Member!
Joined
Nov 3, 2012
Messages
1,474
Location (City and/or State)
Central Arkansas (we moved!)
Thanks for the visual! Would you also need to include an ambient light to a closed chamber like this for babies?
I don't in this size. I made one out of an even larger bin a while back, and hung an LED rope light along the top edge for that one.
 

wellington

Well-Known Member
Moderator
10 Year Member!
Tortoise Club
Platinum Tortoise Club
Joined
Sep 6, 2011
Messages
51,350
Location (City and/or State)
Chicago, Illinois, USA
I can't believe how long, years, these type enclosure have been recommended and only now we get a visual of how to do it. Explaining to someone sometimes was a real job lol
I have 2 questions though. In your first few pics, you have the hole cut, lined with foil, lights sitting over holes. That's the way I always did it and recommended.
Then the pic of the lid underside, shows lights and heat mounted inside.
Of course way back in the day when these were the rage lol, MVB were the bulb of choice. Now we know they aren't good. Anyway, they were to intense to hang inside. Can the incandescent flood hang inside? Is there a reason you showed both ways? What did I miss?
Also, the socket touching the plastic where it's hung inside, won't the che and basking get to hot and melt the plastic? Should foil be placed there?
Thanks for doing the work.
 

biochemnerd808

Well-Known Member
10 Year Member!
Joined
Nov 3, 2012
Messages
1,474
Location (City and/or State)
Central Arkansas (we moved!)
I can't believe how long, years, these type enclosure have been recommended and only now we get a visual of how to do it. Explaining to someone sometimes was a real job lol
I have 2 questions though. In your first few pics, you have the hole cut, lined with foil, lights sitting over holes. That's the way I always did it and recommended.
Then the pic of the lid underside, shows lights and heat mounted inside.
Of course way back in the day when these were the rage lol, MVB were the bulb of choice. Now we know they aren't good. Anyway, they were to intense to hang inside. Can the incandescent flood hang inside? Is there a reason you showed both ways? What did I miss?
Also, the socket touching the plastic where it's hung inside, won't the che and basking get to hot and melt the plastic? Should foil be placed there?
Thanks for doing the work.
Good questions!
Yeah, MVBs (even the 80W Powersun) are wayyy too powerful for such a small setup. Due to their unreliability, I quit using them years ago, and go for the incandescent bulb + tube UVB option.
It may be hard to tell in the photos, so I will attach some close-ups. None of the fixtures sit on top. They are mounted from below at different heights.
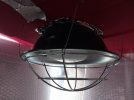
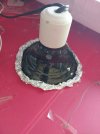
In the red lid one, I had to make a bigger hole to raise the fixture for proper basking temps, because I am using a 40w bulb in that setup. It's mounted from below using a planter basket and wire. The hole is, of course, lined with aluminum foil. 20240816_104552.jpg
Here is a view of that one from below:
20240816_104612.jpg
Bit of a pain to switch out the bulb, but it works.
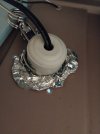
The one with the beige lid has a 25W bulb, so the fixture sits lower. There's still a hole, also lined with aluminum foil. Same for the 40w CHE, it has the socket poking out the top, hole lined with aluminum foil.

Works great this way, have had zero melted plastic or even melted smell.
20240816_104824.jpg
 

wellington

Well-Known Member
Moderator
10 Year Member!
Tortoise Club
Platinum Tortoise Club
Joined
Sep 6, 2011
Messages
51,350
Location (City and/or State)
Chicago, Illinois, USA
Good questions!
Yeah, MVBs (even the 80W Powersun) are wayyy too powerful for such a small setup. Due to their unreliability, I quit using them years ago, and go for the incandescent bulb + tube UVB option.
It may be hard to tell in the photos, so I will attach some close-ups. None of the fixtures sit on top. They are mounted from below at different heights.
In the red lid one, I had to make a bigger hole to raise the fixture for proper basking temps, because I am using a 40w bulb in that setup. It's mounted from below using a planter basket and wire. The hole is, of course, lined with aluminum foil. View attachment 377438
Here is a view of that one from below:
View attachment 377439
Bit of a pain to switch out the bulb, but it works.
The one with the beige lid has a 25W bulb, so the fixture sits lower. There's still a hole, also lined with aluminum foil. Same for the 40w CHE, it has the socket poking out the top, hole lined with aluminum foil.

Works great this way, have had zero melted plastic or even melted smell.
View attachment 377440
Okay I get it now. Yeah the tin foil works great, never had a problem with melted plastic either.
Unfortunately when I was using the totes, it all had to be sitting on the top due to the MVB being the top bulb at that time. It worked, but was harder keeping the humidity up as easy as this way probably is.
Thanks
 
Top