My father and I made a box that will eventually be for my redfoots/cherryheads, but is temporally being used for my 5, almost 6 year old sulcata.
By the way all of this is also show on my facebook page in a folder called turtle/tortoise home ideas
https://www.facebook.com/groups/turtle.and.tortoise.lovers/
After I thought of the size of a house I wanted to make we did the following steps:
Step 1 cut two pieces of plywood the same size (depending on the size you want)
**DON'T forget either the sides or top and bottom need to be longer to fit together. **
Step 2 cut 4 pieces of 2X2 (two long and two short) to fit around the plywood perimeter.
Step 3 screw on 2x2's on the outside of this piece of plywood

Step 4 (OPTIONAL) You can paint the inside before you do step 5, if you want to help with moisture (we did that).
Step 5 cut a piece of insulation to fit inside the 2x2's and place it inside (it should be a perfect fit/ it should fit snugly)

Step 6 cover the piece of plywood you've been working (with the 2x2's and insulation) with the other piece of plywood.
Step 7 Put screws all the way around (we used 12 screws, Two for each corner and one in the middle of each side.) We also countersunk the screws, which I think is very important.

We did the same thing for all 4 sides, the bottom, and the top (but you can make the top different). Although remember either the sides or top and bottom need to be a little longer (the width of two pieces), so they will fit together like a box). So we had 6 pieces like this. We made a floor because this is going on concrete not in the dirt.
.jpg")
Here is another view.jpg")
Then we painted all 6 pieces and let them dry. We used a wood paint with primer but we still gave it three light coats. The first coat just soaked into the wood and didn't cover it well.
After paining we started to cut out the door.
.jpg")
Another view of cutting the door out
.jpg")
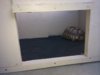
Here is the door opening. We did it this way to show the insulation for everyone to see it was inside the panel.
This picture also shows the truckbed lining spray paint we sprayed inside on the floor to help withstand the moisture. Don't worry we let it air out several weeks before letting the tortoise inside.
.jpg")
Here is the finished project, after the doorway was sanded and sealed. The part I don't like it the door. I will be fixing this, but have other projects that need to be done first.
This picture also shows the handle I put on to open the lid.
.jpg")
Here it is open. Remember I don't like the door and it will be changed.
We made groves, and drilled in a little on both sides of the brown stick so I can screw it in a little to keep the top open when I am checking on my tortoise or doing something inside, even if its windy. THIS PART HAS BEEN VERY HELPFUL! We filled in all the screw holes and pained over them, but they can be taken out it needed or if I ever want to change anything.")

Here is the notch in the brown stick
**Sorry the pictures below this post were just taken tonight and it is dark and soaking wet outside, so they are not the best.**

This picture shows how we drilled the screw whole sideways so I could just hand tighten it a little. I dropped the screw because it was dark so I can't show you it with the screw (sorry).

We also added 4 handles. Two on each side and the best part is they lay flat when not in use.
.JPG")
Another view of one side (each side has two handles) so one person stands on one side and uses two hands to carry the box.
Don't you just love the crickets. ;-)
.JPG")
By the way all of this is also show on my facebook page in a folder called turtle/tortoise home ideas
https://www.facebook.com/groups/turtle.and.tortoise.lovers/
After I thought of the size of a house I wanted to make we did the following steps:
Step 1 cut two pieces of plywood the same size (depending on the size you want)
**DON'T forget either the sides or top and bottom need to be longer to fit together. **
Step 2 cut 4 pieces of 2X2 (two long and two short) to fit around the plywood perimeter.
Step 3 screw on 2x2's on the outside of this piece of plywood
Step 4 (OPTIONAL) You can paint the inside before you do step 5, if you want to help with moisture (we did that).
Step 5 cut a piece of insulation to fit inside the 2x2's and place it inside (it should be a perfect fit/ it should fit snugly)
Step 6 cover the piece of plywood you've been working (with the 2x2's and insulation) with the other piece of plywood.
Step 7 Put screws all the way around (we used 12 screws, Two for each corner and one in the middle of each side.) We also countersunk the screws, which I think is very important.
We did the same thing for all 4 sides, the bottom, and the top (but you can make the top different). Although remember either the sides or top and bottom need to be a little longer (the width of two pieces), so they will fit together like a box). So we had 6 pieces like this. We made a floor because this is going on concrete not in the dirt.
Here is another view
Then we painted all 6 pieces and let them dry. We used a wood paint with primer but we still gave it three light coats. The first coat just soaked into the wood and didn't cover it well.
After paining we started to cut out the door.
Another view of cutting the door out
Here is the door opening. We did it this way to show the insulation for everyone to see it was inside the panel.
This picture also shows the truckbed lining spray paint we sprayed inside on the floor to help withstand the moisture. Don't worry we let it air out several weeks before letting the tortoise inside.
Here is the finished project, after the doorway was sanded and sealed. The part I don't like it the door. I will be fixing this, but have other projects that need to be done first.
This picture also shows the handle I put on to open the lid.
Here it is open. Remember I don't like the door and it will be changed.
We made groves, and drilled in a little on both sides of the brown stick so I can screw it in a little to keep the top open when I am checking on my tortoise or doing something inside, even if its windy. THIS PART HAS BEEN VERY HELPFUL! We filled in all the screw holes and pained over them, but they can be taken out it needed or if I ever want to change anything.
Here is the notch in the brown stick
**Sorry the pictures below this post were just taken tonight and it is dark and soaking wet outside, so they are not the best.**
This picture shows how we drilled the screw whole sideways so I could just hand tighten it a little. I dropped the screw because it was dark so I can't show you it with the screw (sorry).
We also added 4 handles. Two on each side and the best part is they lay flat when not in use.
Another view of one side (each side has two handles) so one person stands on one side and uses two hands to carry the box.
Don't you just love the crickets. ;-)