So I've decided Tilley needs a new enclosure! Let me run some of my ideas through y'all. It'll be about a 5x5, maybe a 4.5x4.5. Walls will be about 8" or 10". I think I'm gonna calk all seams since I'm building this out of simple wood and then paint a white-type thicker latex paint on the entire inside to keep bathroom breaks from soaking into the wood. Also gonna buy a paint roller pan to use as a soaking area. Thought about doing a 2nd story but I find that both unneeded and more difficult than need be. Haven't brainstormed the heatlamp perch yet. Opinions and/or "don't do that!" Comments?
You are using an out of date browser. It may not display this or other websites correctly.
You should upgrade or use an alternative browser.
You should upgrade or use an alternative browser.
Finally get a day off from work...
- Thread starter IowaGuy28
- Start date
- Status
- Not open for further replies.
IowaGuy28 said:So I've decided Tilley needs a new enclosure! Let me run some of my ideas through y'all. It'll be about a 5x5, maybe a 4.5x4.5. Walls will be about 8" or 10". I think I'm gonna calk all seams since I'm building this out of simple wood and then paint a white-type thicker latex paint on the entire inside to keep bathroom breaks from soaking into the wood. Also gonna buy a paint roller pan to use as a soaking area. Thought about doing a 2nd story but I find that both unneeded and more difficult than need be. Haven't brainstormed the heatlamp perch yet. Opinions and/or "don't do that!" Comments?
Stick to 4 ft intervals so you can use plywood which is cheaper per square footage then the crappiest 1x pine, also more solid. Home Depot or Lowes typically offers to cut it up for 25 cents each cut if you don't have access to a skil saw. Up the wall height to at least 12 inches or more. That seemed to be the average minimum for russian torts. There some great ramp and second story ideas on the forums that look like they'd take all of an hour to put together, they're great for exercise for the tort. As for the light, you can find overhanging wires used for hanging potted plants in the gardening aisle. You can screw that to the side and hang the light from a chain.
Oh! Forgot the paint. Latex tends to peel off in sheets. You can water proof with a couple of coats of enamel but in that case, I would just do a coat or 2 of enamel, then a coat of polyurethane to protect from those claws of theirs heh
IowaGuy28 said:So I've decided Tilley needs a new enclosure! Let me run some of my ideas through y'all. It'll be about a 5x5, maybe a 4.5x4.5. Walls will be about 8" or 10". I think I'm gonna calk all seams since I'm building this out of simple wood and then paint a white-type thicker latex paint on the entire inside to keep bathroom breaks from soaking into the wood. Also gonna buy a paint roller pan to use as a soaking area. Thought about doing a 2nd story but I find that both unneeded and more difficult than need be. Haven't brainstormed the heatlamp perch yet. Opinions and/or "don't do that!" Comments?
My apologies. What species and age tortoise are we talking about?
I say go as big as you can fit in your space. I agree the wall should be taller for any species. Once you add 3-4 inches of substrate, you'd only have 4" walls if they were only 8" to start with. I want them to be around 12" tall, AFTER I add the substrate for a small tortoise. If we are talking about something bigger, like a marginated, I would go at least 16" after substrate is added. If your walls a few inches taller than you need them, no harm done. If they are a few inches too short, well...
Unless you are going to be pooling water in your enclosure, I don't think you need to treat the wood at all. I've used regular plywood and 2x4s and never treated it for years. I have some enclosures that have been filled with damp substrate for 20 years. Still holding up just fine.
Can't wait to see what you come up with!!
Oh my. For a 7" sulcata you need to go at least 4x8'. Bigger would be better. You are likely on the verge of a big growth spurt too, so even a 4x8' is not going to last very long. I move them outside full time into 30x30' enclosures with heated night boxes when they get just a little bigger than yours is now.
Sulcatas need a lot of room to roam. They can survive cramped quarters, but it's not good for them.
Sulcatas need a lot of room to roam. They can survive cramped quarters, but it's not good for them.
I only need this new enclosure to last 1 year. I'm in Iowa which is a "Talley can go outside 6 months of the year" state. I also don't plan to stay in my house another 5 years so I am limited to building something either mobile or not permanent. Poor original planning on my plan I will admit but that's OK. Id rather learn quickly than slow ")
Just purchased all the lumber, its gonna be a 4x6x12 (just for now and it temporary) with 4 cross supports. I decided to use some regular bedroom paint to seal the base from bathrooms breaks, it was also painted in the garage to avoid hazardous fumes. A friend of mine informed me one of my cutting measurements is off by 1" total, wish he would have said something Before the cut was made. Luckily its easily fixable. Construction shall commence 2morrow because the garage is just over freezing temps (34) and the paint will either dry or freeze....time to flip a coin.
If you only painted one side of the material you used on the bottom, I would suggest flipping it other and using the raw side instead like Tom suggested. Otherwise you take the risk of the sullies claws easily scrapping up the paint and a chance of it injesting the chips. Just a suggestion.
Well after a first failed attempt I've made two rookie woodworking mistakes, hey gimme a break! I'm good with steel and iron so far, I just recently got into making stuff with wood. My enclosure with be 72x48x12 total and built from fiberboard (mistake #1 that stuff is pretty heavy). I'm not (yet) gonna admit to mistake #2 but will say I should have Googled "how to build a simple box" before starting. Lessons learned, pics of this build and its completion are scheduled for this weekend.
IowaGuy28 said:Well after a first failed attempt I've made two rookie woodworking mistakes, hey gimme a break! I'm good with steel and iron so far, I just recently got into making stuff with wood. My enclosure with be 72x48x12 total and built from fiberboard (mistake #1 that stuff is pretty heavy). I'm not (yet) gonna admit to mistake #2 but will say I should have Googled "how to build a simple box" before starting. Lessons learned, pics of this build and its completion are scheduled for this weekend.
LOL it happens, we're aloud to mess up once in a while. But ya, MDF, particle board, chip board...not the best structure building supplies. Unless you're making a speakerbox, love me some mdf for that. Am I allowed to guess mistake #2?
You didn't account for material thicknesses in your measurements?
You cut the sides a full 8' long and didn't have enough material to make the ends?
The tort didn't like the color?
You didn't reinforce it enough and it was all kinds of shaky?
Heh ok I'm done, you don't know how often I wish I had some metal work knowledge as well. Maybe I'll take some classes eventually, for now I'm wood work centered and some painting skills. Look forward to seeing the pics this weekend, good luck!
I guess mistake #2 is ok now that plans are back on track. Apparently the "logic" side of my brain wasn't running on all 8 cylinders when I attempted to balance the base on top of two of the sides and build from the bottom down. Gravity played its part when one of the board went sideways....
Now that i've rethunk my master planning I'm going to my revised Plan A and building the sides first and attach the base to it *forehead SMACK* DUH! BTW your "You cut the sides a full 8' and didn't have enough material to make the ends" is also true but thats easily worked around. Its also a 4'x6'x12" so it can still fit in my room.
Now that i've rethunk my master planning I'm going to my revised Plan A and building the sides first and attach the base to it *forehead SMACK* DUH! BTW your "You cut the sides a full 8' and didn't have enough material to make the ends" is also true but thats easily worked around. Its also a 4'x6'x12" so it can still fit in my room.
Ah! Gotcha, it folded up on you. I typically build the body first but I have run into something that required attaching two of the sides first. Just for future reference, I found if you just lift one end of the back and angle one side under it (like a lopsided pyramid), you can put a screw in one end and just work your way down, worming it flush. Then you can lift up the other side of the backer and put the other side under it and the weight will hold it down.
The reason I mentioned the 8' thing though was really only an issue if you tried to inset the bottom into the box made of the walls. I've seen alot of people try to build a box that way and forget that you now need the end pieces to be 49 1/2" instead of 48". Easily fixed but on entertainment centers and such, you could have exposed edges like that would cause around the bottom.
Looking forward to the pics
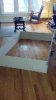

Nice size. Love me some wood floors. How did you fasten the corners?
The corners are fastened with metal 90degree brackets on the outside. There are currently only 1 bracket per side but when I saw how well the idea worked I plan to put one more on each side for added stability. Then on the top/open end im gonna nail down cross supports at each corner using 1x4's (though they are technically .750x3.750 told ya I'm use to metal/iron)
Well, apparently I was off on both the length and width measurements...still not sure how that happened. Luckily, still no harm has been done. Now I get to drill holes for the nails or screws to firmly mount the bottom to the frame. Only HUGE inconvenience I've run into was...I totally chose the Wrong material to build this enclosure out of! The space it provides is great BUT its prolly around the 150lbs mark now and I'm seriously considering keeping it on my main level or move it outside for summer, unlike hauling it upstairs to my room like my original Plan A. Where are my knowledgeable wood-workers at? What material can I build the same exact enclosure out of 4'x7(ish) and not have it weight more than 75lbs?
What is it made of currently? If it's going to be sitting on the ground, you can get away with 3/8" pine ply for the bottom or 1/4" luon if you seal it in some fashion/put in a liner.
Oh wait, you said fiberboard as mistake #1...did you make that out of 3/4" MDF?
Oh wait, you said fiberboard as mistake #1...did you make that out of 3/4" MDF?
- Status
- Not open for further replies.
Similar threads
- Locked
- Replies
- 2
- Views
- 4K
- Replies
- 12
- Views
- 1K
- Replies
- 3
- Views
- 751