Help improve indoor enclosure expansion for Hermes tortoise

Michael Bird

Active Member
10 Year Member!
Joined
Jun 25, 2010
Messages
246
Location (City and/or State)
Salt Lake City, Utah
Hermes, my approximately 4.5-year-old Hermann's tortoise, has spent the summer enjoying the 12 foot by 14 foot outdoor enclosure that I set up for him, filled with lots of green things to eat, a deep cave, and plenty of other hiding spots.

However, we've had well below freezing temperatures for the past week, and Hermes is showing absolutely zero sign that he wants to brumate (which is probably a good thing since this is his first year with us) so he has been forced to stay inside all of the time now, and he has made it very clear that he HATES going from having nearly 170 square feet of roaming area to only about 6 square feet in the Aivituvin "Large" Turtle Habitat box that he lived in with his previous owners and that came with him when I adopted him in April of this year.

I was already planning to set up something appropriate inside the house for winter, but this freezing spell came as a surprise and earlier than usual for our area, so now I need to rush to get it built.

Unfortunately, the available indoor space is very limited, so there is simply no way that I can give him a huge space to roam like I would want to, but I want to give him as much space as I can, so I've come up with a potential idea using the space that is available, that will give him about 28 square feet of floor space to wander in. That's pretty close to the 32 square feet (8'x4') that I've seen people recommend for indoor enclosures for small tortoises, so I'm hoping it will be enough to keep him happy until he can go outside again.

For a little background, the room where this will be set up can't be changed much, so I'm trying to make the best use of what is already in the room. There are two dressers (chests of drawers) that the enclosure will sit on top of as well as extending out as much as possible on one side. There is a south facing window in the room that the box will extend below and in front of to get some natural light in addition to the lighting fixtures, and I will be building a two shelf indoor greenhouse in the window frame above that portion of the box to have a place to try to keep some healthy things growing to supplement grocery store produce during the winter, and to start new plants growing in preparation for replanting the outdoor enclosure in the spring. The "shelves" in the greenhouse will be made of metal mesh cloth or chicken wire with a supporting frame so that light can pass through and also so that any water overflow from the plant pots and seed starters can drip down to the soil substrate in that section of the tortoise enclosure to help keep the humidity at healthy levels.

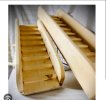
This is a very rough outline using Google Sketchup, so I hope it portrays the idea well enough. The front panels of each of the three sections will be hinged to swing out for easy access to the enclosure for cleaning and other maintenance. There is a solid wall border around the top of the ramp so he can't accidentally - or intentionally - jump off the top of the middle section onto the ramp and hurt himself. There will also be a side barrier on the ramp itself but it made the ramp impossible to see in the pictures when I put that barrier in, so just pretend that it's there. :)

Part of the side wall between the greenhouse and the middle section will be made of the same clear material (probably sheet acrylic plastic, or whatever I can find) as the front panels to let some of the light from the window in to also supplement the light fixtures. The top, right, and front walls will be something opaque like greenhouse corrugated plastic to keep the light, heat, and humidity inside the greenhouse where it should be. I just made them transparent in the model to make it easier to see the inside.

I plan to have the substrate about four inches deep across both bottom sections so he will have plenty to dig in but will still be able to walk through the arch that separates the greenhouse from the rest of the enclosure. I'll either have a fairly thin layer of substrate on the top floors for walking on but not really deep enough to dig in since it would just slide down the ramp, or else a reptile carpet or something similar covering the floor so he can still have something comfortable to walk on without kicking everything down the ramp.

One of the things I am not sure about is if I need to add any extra lighting or heat source to the bottom part of the dual layer middle section since the light from the heat lamp and UVB fixture won't really reach into that part of the enclosure, or just have that whole section be a dark "hide". I'm also debating whether to use open mesh for the entire "roof" of the middle section to allow the UV light to fill the whole area, or to only have a strip in the center open for the light and the rest closed off to reduce airflow and humidity loss. Even with the temperatures well below freezing outside, the area directly in front of the greenhouse window is quite warm and very bright so it will be good for the plants and provide a warm space for him to hang out if he doesn't want to climb up to where the heat lamp is on the left side.

I think I'll probably get rid of (or chop up) the front wall of the gray Aivituvin box and make it match the rest of the enclosure with the top half as a window instead of just that small rectangle window that the box has now.

I suspect that the angle of the ramp might need to be adjusted. At the angle in the picture, I know he won't have any trouble going up, but I'm concerned that it is too steep for him to go down safely, so I plan to make the actual ramp piece first and cover it with a good texture that he can grip easily (fake "grass" carpet designed for reptile enclosures, for example) and set up a test area where I can put the ramp at various angles to see how well Hermes can climb it (or not) and to find an angle that works well for him so that he will actually make use of it, and then build the middle box and the opening to the second floor with that ramp angle in mind.

The enclosure cannot extend out any farther from the wall (towards us in the first picture) so the 2 feet/24 inches of depth I'm using in this model is the limit, and it also cannot go any farther to the left or the right. However, if I want to go nuts a bit and give him more space, I can add another layer above the two left sections, but that would put him high enough that he can't really be seen from the floor, and would require a ladder to access those areas for cleaning and maintenance, so I don't think I want to do that unless he still isn't happy with this amount of space. I could also drop down for another layer on the far right side below the greenhouse, but again I'm not sure I want to do that because that section is intended to be sealed and waterproof to catch the drippings from the greenhouse.

I'd appreciate any suggestions that you can think of to tweak or improve my first draft such as positioning of the ramp or the lights or anything else.

Indoor box and greenhouse front view.JPG

Indoor box and greenhouse top view.JPG

Indoor box and greenhouse end view.JPG
 

Alex and the Redfoot

Well-Known Member
Joined
Aug 21, 2023
Messages
1,401
Location (City and/or State)
Cyprus
Wow! That's very impressive project (and I bet it would be even better "materialized").

A few suggestions:
1. Place UV light near the basking lamp. This way it's closer to a natural sunlight and Hermes will easily figure out how to make use of it. Or it might be even better to move the heat lamp to the middle.
2. Maybe you can make middle top floor ramped, to make the second greenhouse floor accessible for roaming (and get the magic 32 sq.ft. of indoors space).
3. I would opt for the closed top enclosure. You can cover the whole heating and lightning setup in the middle with a box/greenhouse top.
4. I would add some light in the bottom. Kitchen cabinet LED strips or something alike (bright and low-profile). Hard to say about heating without exact temperatures. Low-wattage CHE might be added later, I think.
5. If you are going to use wooden boards for the floors - don't forget to line with something like a shower curtain.
6. For the substrate orchid bark would be better than soil.

Please, keep us updated on your progress. I'm intrigued!
 

Michael Bird

Active Member
10 Year Member!
Joined
Jun 25, 2010
Messages
246
Location (City and/or State)
Salt Lake City, Utah
I've managed to find a little bit of time to build part of the new enclosure and I'm close to the point where I'll be setting up the ramp to the upper level. I'm stuck trying to figure out what would be the best option to add some traction to the ramp to aid in climbing up and down. Durability and/or easy to clean would be really nice.

I need 8" by 24", so a bulk pack in sizes that will work is also a nice bonus.

There are lots of different "carpet" options designed for floors in snake/lizard terrariums that might work. At 15"x48", cutting it into quarters would be just slightly too narrow for my intended ramp, but only by 1/2 inch so that would be fine. That would effectively give 8 replacement liners out of the 2-pack. My biggest concern with this is that the carpet is REALLY thin. That's not a problem for reptiles with tiny sharp claws, but might not give enough traction for tortoise claws..
https://www.amazon.com/dp/B07RW5JRG8/?tag=exoticpetnetw-20

I've also found some woven coconut coir sheets that look interesting. There are a wide variety of sizes including a three pack of 18"x24", so I could make six replacement liners out of that package. It is 1/4" thick so it is a lot thicker material than the carpet, and also seems to be a looser weave in the pictures, so it would almost certainly give more traction, but might be less durable.
https://www.amazon.com/dp/B0C33GK8BP/?tag=exoticpetnetw-20

Any preference for either of these? Or for something else I haven't thought of yet? Thanks!
 
Last edited:

Michael Bird

Active Member
10 Year Member!
Joined
Jun 25, 2010
Messages
246
Location (City and/or State)
Salt Lake City, Utah
I'm also having trouble finding pure (no fertilizer or pesticides) orchid/fir bark. Lowes and Home Depot are out of stock and the specialty garden shops that I called said they don't sell it. Ordering online makes me a little nervous since I can't look at the packaging to see if the product is actually just bark without unhealthy additives.
 

Alex and the Redfoot

Well-Known Member
Joined
Aug 21, 2023
Messages
1,401
Location (City and/or State)
Cyprus
A suggestion on ramp: maybe plant bed fence could work (those made of half-round wooden planks or willow). Also you can use wooden planks to make "stoppers" or steps on the ramp.

Perhaps, soft rubber mats or strips could be used. I doubt there will significant fumes amount.

--
Maybe HD or Lowes can order it for you from other shops, if you are not tight on time.
https://www.lowes.com/pd/BETTER-GRO-Orchid-bark-8-Quart-Organic-Potting-Soil-Mix/50284911 - that's how bag looks like. Important thing: it must be *Potting Media* on label, not Potting Soil Mix.

You can use coco coir bricks instead of orchid bark. Or look for Reptibark in pet stores or online (price is a bit upsetting, though).
 

Michael Bird

Active Member
10 Year Member!
Joined
Jun 25, 2010
Messages
246
Location (City and/or State)
Salt Lake City, Utah
I ended up buying the woven coconut fiber mats that I linked to in my last message. They arrived today. They are nice and thick, at around 3/8", although the weave does seem to be somewhat loose so I'll have to wait and see how well they stand up to abuse from Hermes once I decide how to set up the ramp and attach the mat to the ramp so that it will stay, but that I can also remove/replace it easily as needed.

I asked both Home Depot and Lowes if they could order the fir bark so that I can see it (to be sure it's the pure bark kind and not the potting soil mix, since they said they couldn't see a difference in their system) and they said no. I'd have to pay ahead of time and just take whatever gets delivered. I'm going to ask at the local IFA (farm supply) store this weekend to see if they have something that will work. In the meantime, I do have a pack of three large coco coir bricks so I can use that as a base substrate for now and just pile the bark on top later.
 

SuzanneZ

Well-Known Member
Joined
Oct 7, 2023
Messages
401
Location (City and/or State)
Georgetown
I'm also having trouble finding pure (no fertilizer or pesticides) orchid/fir bark. Lowes and Home Depot are out of stock and the specialty garden shops that I called said they don't sell it. Ordering online makes me a little nervous since I can't look at the packaging to see if the product is actually just bark without unhealthy additives.
I don't want to advertise for Chewy, but in this one case I will. The fir bark I got from them last week is very good quality, no crumbs. Jurassic 8 qts. , about $9, $5.95 shipping for it and two husks.
 

Michael Bird

Active Member
10 Year Member!
Joined
Jun 25, 2010
Messages
246
Location (City and/or State)
Salt Lake City, Utah
I don't want to advertise for Chewy, but in this one case I will. The fir bark I got from them last week is very good quality, no crumbs. Jurassic 8 qts. , about $9, $5.95 shipping for it and two husks.
That's not a lot more expensive than the hardware store stuff, and a LOT cheaper than buying the ReptiBark branded stuff from a pet store. Thanks!

Are the chunks pretty small, or are they big/long "slivers" like in the forest floor stuff? Hermes seems to like to pick up longer stuff, like the stems in his food, and drag them around while they are shoved up into the spaces between his legs and his shell, and I really don't think it's a good idea to have wood bedding that would do the same thing.
 

SuzanneZ

Well-Known Member
Joined
Oct 7, 2023
Messages
401
Location (City and/or State)
Georgetown
That's not a lot more expensive than the hardware store stuff, and a LOT cheaper than buying the ReptiBark branded stuff from a pet store. Thanks!

Are the chunks pretty small, or are they big/long "slivers" like in the forest floor stuff? Hermes seems to like to pick up longer stuff, like the stems in his food, and drag them around while they are shoved up into the spaces between his legs and his shell, and I really don't think it's a good idea to have wood bedding that would do the same thing.
That's not a lot more expensive than the hardware store stuff, and a LOT cheaper than buying the ReptiBark branded stuff from a pet store. Thanks!
Jurassic bark, left, coco husk
Are the chunks pretty small, or are they big/long "slivers" like in the forest floor stuff? Hermes seems to like to pick up longer stuff, like the stems in his food, and drag them around while they are shoved up into the spaces between his legs and his shell, and I really don't think it's a good idea to have wood bedding that would do the same thing.
Camera was handy. Left is Jurassic bark dry, rt. coco husk soaked.
 

Attachments

  • IMG_20231117_131804.jpg
    IMG_20231117_131804.jpg
    1.3 MB · Views: 8

Michael Bird

Active Member
10 Year Member!
Joined
Jun 25, 2010
Messages
246
Location (City and/or State)
Salt Lake City, Utah
It took longer than I wanted, delayed by my extreme lack of free time lately, as well as by other urgent projects around the house, and a "time-out" when my super old table saw broke and I had to wait for a nice new one to be delivered, but I finally have the expanded box mostly assembled. I still need to do some minor touch-up work, and put the walls on the greenhouse frame that is assembled but not installed yet, and decide on a lid for the top of the middle section (depending on lighting arrangement), but overall it turned out pretty good.

I will probably paint or stain the outside eventually, but for now I just wanted to get it set up so that Hermes can use it for the winter.

The floor of all of the boxes is sealed with a double layer of thick plastic sheeting across the bottom and about 4 inches up the sides (leftover underlayment from a wood floor replacement), then about two inches of moistened coconut coir, then another two inches of the Jurassic Fir Bark from Chewy. Hermes has spent his whole indoor life so far on a combination of coir "dirt" and bark chips so I thought I'd keep things consistent for him. I might add more of the bark in the lower sections eventually, but I want to see how he does with what is there now. He has burrowed all the way down to the plastic to make a couple of "hollows" to nap in so I guess he likes it. You can just see the top of a hollow half log hide below the ramp. He sleeps in there a lot as well. The Jurassic Fir Bark chunks ended up being a LOT bigger than the Reptibark stuff, with most pieces around 1 inch and a few as big as 2 1/2 to 3 inches long, but Hermes doesn't seem to mind.

It took him about a week to figure out the ramp, and I had to help him move between the upper and lower levels for a while when he got 'lost', but he cruises up and down the ramp very frequently now. The ramp surface is the coconut fiber mats that I mentioned in early November. They are thicker than I expected so give some really good traction, and were very difficult to cut with sharp scissors so I hope it will be sturdy enough to last for a while, and there was a lot of it in the package so plenty of replacements as needed. It's held down with a few strategically placed industrial staples on the edges so it won't slide, and won't bother the tortoise.

The enclosure is modular so I can take any of the five sections (including the greenhouse) apart separately as needed, and they are held together with a few screws through the frames to keep them secure and prevent things from shifting unexpectedly.

Each of the new boxes is currently getting light from several small LED light strips on timers. They light things up nicely but do not provide any heat. For now they are just stuck on with tape, and will be mounted properly after I decide on the final arrangement. I currently have both the basking light and the UVB light over the gray box on the top left since it has a wire mesh lid. I'm debating whether to leave them like that, or to maybe move the UVB over the top middle box. I'll also probably put a second light bulb fixture inside the greenhouse to supplement the light for plants and to provide a second warm basking spot in that area if Hermes wants it. I have measured all of the boxes individually with my thermometer/hygrometer and both bottom boxes are staying consistently around 60-70% humidity and 70-72 degrees Fahrenheit (same as the outside room temperature). The top middle box is hovering around 75-78 degrees Fahrenheit and 45-50% humidity, the gray box with both lights stays around 30-35% humidity and up to 105 degrees under the basking light. I've done all of this testing without adding any moisture to the environment for two weeks other than his water dish and occasional wet food pellets in the same box as the basking lights, just to see how well the enclosure retains humidity on its own. The blue humidifier on the gray box is for me and only sprays mist into the room and not into the box, but I suspect it probably does help supplement the humidity in the gray box a little.

I'm using two of the side pieces of the greenhouse as temporary lids for the right box and the top middle box to keep them enclosed until they are finished.

I'd appreciate your suggestions on optimizing the light and heat situation.

The fronts of both of the middle boxes swing down on hinges to provide easy access to the insides of the boxes. I'm not happy with the current retaining 'locks' for those swinging doors as they are just screw eye hooks with bolts through them, but this entire project was done as much as possible with stuff that I already had on hand, so I used what I have and I'll figure out something better later. :)

PXL_20231229_012425091.jpg
 
Last edited:

PinkPine

New Member
Joined
Dec 17, 2023
Messages
17
Location (City and/or State)
Michigan
Great job, this looks awesome! Are you going to make a "railing" on the ramp, so the tortoise can't tumble off? A quick Google search & I found an example
 

Attachments

  • Screenshot_20231228-221816_Chrome.jpg
    Screenshot_20231228-221816_Chrome.jpg
    81.1 KB · Views: 4

Michael Bird

Active Member
10 Year Member!
Joined
Jun 25, 2010
Messages
246
Location (City and/or State)
Salt Lake City, Utah
Great job, this looks awesome! Are you going to make a "railing" on the ramp, so the tortoise can't tumble off? A quick Google search & I found an example
Yes, I am planning to put something there. I haven't decided yet whether to put a partial railing that will look nicer and let me see him on the ramp, or a full floor to ceiling "wall" so there's no possibility of even trying to climb over it.
 

Michael Bird

Active Member
10 Year Member!
Joined
Jun 25, 2010
Messages
246
Location (City and/or State)
Salt Lake City, Utah
Greenhouse is in place, and I fixed (sort of) the latches on the hinged doors on the middle section. They are easy release screw eye and hook latches that have "security" springs so the cats can't open them by playing with them.

I left the front off of the greenhouse to get a picture of the inside.

I left the wire grating off of the right side of the lower shelf so that I can actually reach inside the bottom box for cleaning or other needs, and also so I can put a couple of taller tree sprouts in pots down into the bottom box so that they will actually fit below the top shelf.

I am having trouble finding anyone willing to sell regular incandescent light bulbs locally, and the one in the heat lamp on the left is the last good bulb that I have, so the heating light in the greenhouse will have to wait until I can find a new source.

It turns out that I measured the space for the greenhouse incorrectly in my original plans, and I don't have enough of the semi-clear greenhouse wall material to do the entire box top to bottom, so I ended up putting a 6 inch strip of wood around the top where there won't be any direct sunlight anyway, and the rest will be clear to allow light in from the window behind the box, and for me to see in from the front and for the cats to see in from the sides since they like to sit and watch Hermes walk around. The wood strip on the top front is also hinged to swing up above the box to allow easier access when moving plants in and out of the top shelf.

It's late evening and I don't want to turn the lights on manually and have to reset the daytime timers for them again right now, so the lights are off for this picture, except for the overhead lights in the room.

PXL_20240104_031012694.jpg
 

Alex and the Redfoot

Well-Known Member
Joined
Aug 21, 2023
Messages
1,401
Location (City and/or State)
Cyprus
It's very impressive job! Thank you for detailed updates! Hermes must be very happy to roam around.

1. Incandescent bulbs:
* that's the recent thread with some ideas where to find them: https://tortoiseforum.org/threads/where-are-you-buying-incandescent-bulbs.209983/
* there are "pet-branded" bulbs available like Arcadia Solar Basking Floodlight, there are also ones from Exo-Terra (perhaps ZooMed makes them too).

2. On improving heating and lightning. I'm not sure what exact questions you have. Some things I've noticed:
1. LED strip lights should be 6000-6500K (cold day lights). They look yellowish on photo hence the suggestion.
2. Moving UVB lamp from basking spot is not a good idea. Tortoise expects to find light, warmth and UVB in the same area (like under the sun). If you move both and close mesh top of the left top box - this might make sense. Also you can add one-two computer fans move warm air around the enclosure.
 

Michael Bird

Active Member
10 Year Member!
Joined
Jun 25, 2010
Messages
246
Location (City and/or State)
Salt Lake City, Utah
1 - Thanks. I'll take a look at that thread. I've been trying to avoid the pet-specific bulbs because they are a LOT more expensive. But we might have to go that rout with everyone else switching to LEDs.

2 - I honestly don't know what color temperature the LED strip lights are, but they are supposed to emulate "natural sunlight".

As for the request for suggestions on improving heating and lighting. Just looking for suggestions anyone might have that are better than what I've planned so far. The basking lamp and UVB fixture are staying together over the left side box since it already has a partial open mesh top for the lights. If I can find some more incandescent bulbs so I can put another light fixture inside the top of the greenhouse, that will provide some extra light and heat to that side of the enclosure, but will be generally spread out and not a basking spot. The small fans for circulation might be an option if the addition of the second light is not sufficient.
 

Alex and the Redfoot

Well-Known Member
Joined
Aug 21, 2023
Messages
1,401
Location (City and/or State)
Cyprus
1. Yes, "pet-branded" bulbs are overpriced. But they are easiest to get now...
2. Okay. No urgent need to change them. Cold day lights are helpful to keep tortoise active when brumation season starts. But Hermes doesn't seem to need them.

For heat/lights in the greenhouse you can go with a LED strip and a ceramic heat emitter (it can also warm up things at night). CHE aren't too expensive and good quality ones serve years and years.
 

Michael Bird

Active Member
10 Year Member!
Joined
Jun 25, 2010
Messages
246
Location (City and/or State)
Salt Lake City, Utah
Time for another update. I picked up some small 'security' hook-and-eye gate latches to make it easy to open the front panels of the two middle boxes, but also make it virtually impossible for the cats to open the latches since they are held in place with a sliding sleeve on a spring.

I also decided to make the entire front panel of the greenhouse removable instead of hinged to make it really easy to access the entire inside when I need to. I used some really strong ring magnets and a combination of some bolts, nuts, and big washers to make some custom magnetic cabinet latches that don't slip and are capable of holding on even if a cat is hanging from one of them. (Ask me how I know :D). It takes some effort to pull on the bolt knobs to separate them from the magnets, but not enough to be problematic, and sturdy enough to keep the panel in place when I don't want it to move. Since the greenhouse paneling is corrugated plastic, I split the bottom of the panel a bit so that it wraps around and sits on top of the wood wall so the bottom can't move at all until I release the magnets and lift the panel up. I'll probably put a couple of retaining brackets down there as well just to add to the stability in case the plastic manages to slip off of the wood paneling.

I was able to find one old 40 watt incandescent bulb in a drawer so it is acting as temporary heat lamp for the greenhouse until I can find something better. Since it's fairly low power, I have it sitting directly on the upper shelf to get it a bit closer to the plants and to the lower section of the tortoise box. A quick test shows that even with the very low power bulb, it is keeping the bottom of the greenhouse about 5 degrees warmer than the rest of the room, and the first shelf where the seedling trays are sitting is about 8-10 degrees warmer.

In the "open" photo you can probably see that I decided to go ahead and start germinating some seeds for plants even though it's only early January and if anything does grow they will be ready to go outside long before the outside is ready for them. I'll deal with that when the time comes, or since they are all tortoise edible plants, I might just let Hermes eat the entire plants and start some more seeds when it's the right time to do so.

I also put my two mulberry tree saplings in the open right section of the greenhouse and buried the bottoms of their pots (with drainage holes) directly into the substrate in the lower tortoise box. Hopefully they are secure enough that Hermes won't knock them over while exploring, or he won't decide to take a bite out of the small, fragile stems before they grow strong enough to not be an easy snack...

The second photo is with the side panel on the greenhouse just to show the pretty "rainbows" from the lights through the corrugated panel. :)

PXL_20240108_015521200.jpg


PXL_20240108_015601250.MP.jpg


In case anyone is interested, and as a reminder to myself, I planted Calendula, Coneflower, Hollyhock, pink Hardy Hibiscus, blue Rose of Sharon, all from seeds that I collected last fall, and some Spring Mix lettuce seeds from a garden store seed pack, and some Testudo Broadleaf seed mix from TortoiseSupply. I separated out the Spring Mix and Testudo seeds into seeds that look the same (so hopefully the same plants) and planted the similar seeds in sections in the starter trays in the hope that I'll be able to identify the individual plants and therefore know which seeds in the mixes grow which plants for future reference. I have the remaining seeds of each type in separate numbered containers so I'll know which seeds went into each section if/when they actually grow.
 

Michael Bird

Active Member
10 Year Member!
Joined
Jun 25, 2010
Messages
246
Location (City and/or State)
Salt Lake City, Utah
Slight change of plans that is too late for an edit on the last message.

I realized that it probably is not a good idea to have the warm incandescent bulb shining directly on the mulberry trees, so I moved the lamp fixture above the seedlings (that do want the extra heat) and put part of the LED grow light set closer to the mulberries to give them some gentler light and no direct leaf baking heat.
 

New Posts

Top