Around $400.How much did this box cost with everything you've installed
You are using an out of date browser. It may not display this or other websites correctly.
You should upgrade or use an alternative browser.
You should upgrade or use an alternative browser.
Single Tortoise Night Box
- Thread starter Tom
- Start date
Wpagey
Member
How big is the opening of that single tort nightbox? Thanks for sharing these pics, my box is being modeled after this for our single 11yr old sulcata, and I don’t want to be widening it in 10 years!I like my larger tortoises to live outside full time. My climate permits this year round with a little help. For people who live where it snows all winter, this type of box is still good for warmer weather, getting them out earlier in Spring, and keeping them out a bit later into fall. You'll need something else for the dead of winter. Or you can move South!
The top of this box is half a sheet of plywood, insulated and sealed, so 4x4 feet. The inside of the box ends up being around 40x40 inches when its all done. I use an 18x28 inch Kane heat mat on the floor, and a 21" radiant heat panel on the top. Both are controlled by the same thermostat: https://www.lllreptile.com/products/13883-zilla-1000-watt-temperature-controller
I lower the RHP so that it is within 6-8 inches of the tortoises carapace that lives in the box. I like to screw a plastic shoe box to the back of the box to contain all the extra wires and thermostat. Weather strip seals the top where the hinged lid meets it, and I use plastic freezer stripping across the door to hold in heat when the door is open. The door drops down like a drawbridge and makes a ramp fro the tortoise to get in and out easier. I latch the door shut every night and open the door every morning.
In summer our daytime highs are usually right around 100, with night time lows around 65. I unplug the boxes during this time and temps stay between 70 and 90 in them. In Fall, we have warm sunny days usually into December, so I set the thermostat to 80. As soon as the weather turns cold in winter, I bump the thermostat up to 86, so they always have an area to get warmer in on a cold rainy day here. Spring time brings back warmer sunny days, so I lower the box temp back down to 80. This routine works great for any tropical species like Stars, radiata, sulcatas and leopards.
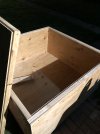
Here is the box during construction. I frame the plywood walls with 2x4s and use 1.5" rigid foam as insulation. Then I seal it with silicone caulking and cover the walls with plywood inside.
View attachment 291639
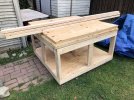
Here is all the electrical stuff going into it:
View attachment 291640
View attachment 291641
Here I want to show the weather stripping in place, and the drip loop. The drip loop is simply draping the cord down a bit so that when it rains, the water drips down the cord to the ground instead of following the cord downhill right into the box.
View attachment 291642
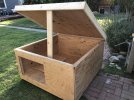
Ready to keep a tortoise warm and safe at night:
View attachment 291643
This is a great way to house a large leopard or sulcata in a relatively warm climate. We get cold winter nights in the 20s and this box, built and heated this way, keeps them in the 80s. Because my climate is so dry, I usually add a 5 gallon bucket or some tubs of water to generate some ambient humidity inside the box. People in the South East US wouldn't need to do this.
Questions and conversation are welcome!
For larger tortoises, multiple tortoises, and a different heating strategy, see this thread:
Double Door Night Box
As the years have gone by and I build more of these boxes, I learn more and more each time. This one is the latest and I incorporated everything I've learned over the years. I also tried to take lots of pics so I can explain in more detail some of what is going on. It will take multiple posts to...tortoiseforum.org

For an adult sulcata, I make the door 16 inches tall and 26 inches wide. This will accommodate all except the super huge Sudan males.How big is the opening of that single tort nightbox? Thanks for sharing these pics, my box is being modeled after this for our single 11yr old sulcata, and I don’t want to be widening it in 10 years!
Wpagey
Member
billiondollars
New Member
For sulcatas I put down a layer of dry dirt to make clean up easier. For some species I make the boxes waterproof with Pond Shield and use damp orchid bark substrate.
billiondollars
New Member
For sulcatas I put down a layer of dry dirt to make clean up easier. For some species I make the boxes waterproof with Pond Shield and use damp orchid bark substrate.
Thank you!
Would the layer of dry bark work?
Dry bark will break down and become very dusty. There is no point in using it.Thank you!
Would the layer of dry bark work?
So hubby and I already have all the materials we need except the insulation and caulk. But we were wondering if we should start with a smaller opening since our Sully is only 6lbs right now, and cut it out larger as he grows? Obviously keeping the door/ramp itself and the freezer sheets still at the correct size? Or just go with the larger doorway right away?
Also thanks to whoever linked the kane mats on tort supply! They are 1/3 of the price of Amazon! I’ve been dreading the cost and now I’m not!
Also thanks to whoever linked the kane mats on tort supply! They are 1/3 of the price of Amazon! I’ve been dreading the cost and now I’m not!
billiondollars
New Member
So hubby and I already have all the materials we need except the insulation and caulk. But we were wondering if we should start with a smaller opening since our Sully is only 6lbs right now, and cut it out larger as he grows? Obviously keeping the door/ramp itself and the freezer sheets still at the correct size? Or just go with the larger doorway right away?
Also thanks to whoever linked the kane mats on tort supply! They are 1/3 of the price of Amazon! I’ve been dreading the cost and now I’m not!
That’s what I did - a smaller door now with an option to cut it larger later.
Yeah I just feel like that will cut down on my electric usage!That’s what I did - a smaller door now with an option to cut it larger later.
Build the door the full 26x16 inches. This way you are all set for later as the tortoise grows and the box is framed correctly and structurally sound. Then simply cut out a rectangle of plywood a little larger than your door that will be screwed in and cover the whole door entry way. Then cut a rectangle out of your fitted plywood piece just a little bit larger than your tortoise. As the tortoise grows, you can periodically remove that plywood piece and keep cutting ever larger openings until the tortoise is finally large enough to just need the whole larger door. Works like a charm and it is MUCH easier than trying to enlarge the door hole on a previously built box.So hubby and I already have all the materials we need except the insulation and caulk. But we were wondering if we should start with a smaller opening since our Sully is only 6lbs right now, and cut it out larger as he grows? Obviously keeping the door/ramp itself and the freezer sheets still at the correct size? Or just go with the larger doorway right away?
Also thanks to whoever linked the kane mats on tort supply! They are 1/3 of the price of Amazon! I’ve been dreading the cost and now I’m not!
Now... Ask me how I know all this...
")
- Joined
- May 23, 2015
- Messages
- 191
I built a heated night box based on your plans with the same heat mats and everything. I have my thermostat mounted on the cool side a couple inches above the ground and it is usually around 75-78 at the coldest points of the night. The weather now its starting to get down into the low 50s and 40s. Is this alright for her cool side? I don't know why I'm having such a hard time keeping the cool side at least 80. Thanks for your help.
What is the thermostat set to? Do you mean the remote probe for the thermostat is on the cool side near the ground? What is the temperature on the warm side and elsewhere?I built a heated night box based on your plans with the same heat mats and everything. I have my thermostat mounted on the cool side a couple inches above the ground and it is usually around 75-78 at the coldest points of the night. The weather now its starting to get down into the low 50s and 40s. Is this alright for her cool side? I don't know why I'm having such a hard time keeping the cool side at least 80. Thanks for your help.
- Joined
- May 23, 2015
- Messages
- 191
It’s set really high in the 100s. And yes that’s what I mean. I also have a little temperature measurer in the same place that sends the temps to my phone. I don’t have anything measuring the temperature on the warm side by the heaters yet.What is the thermostat set to? Do you mean the remote probe for the thermostat is on the cool side near the ground? What is the temperature on the warm side and elsewhere?
The next question is: If the thermostat is set that high and the temp is that low, then are the heat sources constantly on? They should be in this circumstance. If this is the case, then everything is functioning correctly, and you need more heat. What heat sources are you currently using and what wattage?It’s set really high in the 100s. And yes that’s what I mean. I also have a little temperature measurer in the same place that sends the temps to my phone. I don’t have anything measuring the temperature on the warm side by the heaters yet.
- Joined
- May 23, 2015
- Messages
- 191
I'm using the same heaters you mentioned in this post. The 18x28 inch Kane heat mat on the floor, and a 21" radiant heat panel 6-8 inches above the top of her shell. Theyre plugged into the same thermostat and I think they are constantly on. When I take her out in the morning, she is always on the cool side tho. I don't know if maybe my wifi temperature reader is just off a couple degrees or something. And I did insulate her house with the 1.5 inch insulation in all the walls, roof, floor but there are a few gaps like an inch or two without it within the walls where the insulation isnt flush against the interior framing. I dont know if that would cause problems. Maybe I just need to buy new heat mats, I've only had them maybe 3-4 years.The next question is: If the thermostat is set that high and the temp is that low, then are the heat sources constantly on? They should be in this circumstance. If this is the case, then everything is functioning correctly, and you need more heat. What heat sources are you currently using and what wattage?
Did you caulk and seal each seam as you went along? Do you have door flaps? Is there weather stripping along the top where the lid sets down?I'm using the same heaters you mentioned in this post. The 18x28 inch Kane heat mat on the floor, and a 21" radiant heat panel 6-8 inches above the top of her shell. Theyre plugged into the same thermostat and I think they are constantly on. When I take her out in the morning, she is always on the cool side tho. I don't know if maybe my wifi temperature reader is just off a couple degrees or something. And I did insulate her house with the 1.5 inch insulation in all the walls, roof, floor but there are a few gaps like an inch or two without it within the walls where the insulation isnt flush against the interior framing. I dont know if that would cause problems. Maybe I just need to buy new heat mats, I've only had them maybe 3-4 years.
Your heat seems to be escaping somewhere. If we can stop that, it should all work better. If not, adding another RHP will help.
- Joined
- May 23, 2015
- Messages
- 191
Yes, I caulked and sealed each seam. I dont have door flaps, but I wouldnt think that would affect the temperature throughout the night. Im planning on adding them on soon, I also dont have the weather stripping along the top, I'm planning on adding that soon too. Hopefully those two things will help, thanks for your help!Did you caulk and seal each seam as you went along? Do you have door flaps? Is there weather stripping along the top where the lid sets down?
Your heat seems to be escaping somewhere. If we can stop that, it should all work better. If not, adding another RHP will help.
The flaps make a surprising difference, and the weather stripping is essential for this to work.Yes, I caulked and sealed each seam. I dont have door flaps, but I wouldnt think that would affect the temperature throughout the night. Im planning on adding them on soon, I also dont have the weather stripping along the top, I'm planning on adding that soon too. Hopefully those two things will help, thanks for your help!
Keep us posted on whether or not these seemingly minor details fix the problem. I think they will.
Similar threads
×