*Turtle Table- Much Better!*

Status
Not open for further replies.

karlyholmes

Member
5 Year Member
Joined
May 30, 2012
Messages
98
Okay so i took lots of the advice given to me from posting pics of my newly built turtle table last week. Thank you ALL for your attentive help! The enclosure had not only the obvious things wrong but my substrate needed a big moisture boost as well.

Here is the table when it was first built and before I knew what was wrong with it:

DSC_0668.jpg


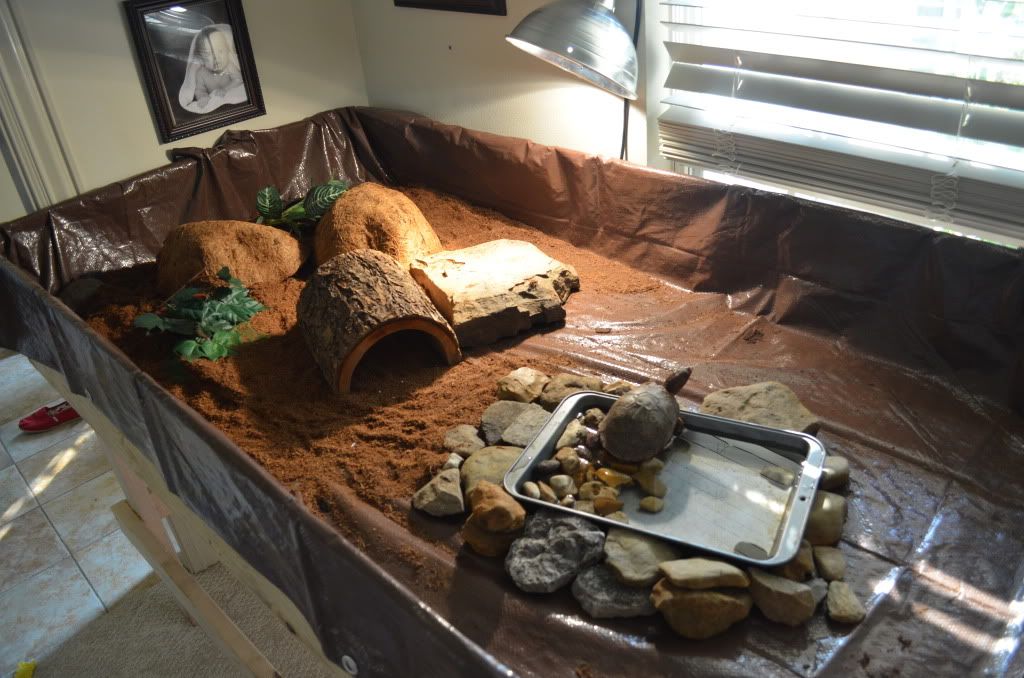
As was obvious to everyone but me, the substrate was dry and only on one side. The water feature was severly lacking. Not a severe problem but I want to point out that there was only one bulb and my house is pretty cool (71 or so). This table does have baby gates over the top for escape prevention but I have a question about THAT as well.

Here is the new and very improved turtle table:

DSC_0672.jpg


I got cypress mulch as many of you suggested and mixed it with my already existing coco coir. Its AWESOME! Very moist. Im misting twice a day because of the open air though... You can also see the second heat lamp put in to warm the water and the right side of the table. The temperatures on this side are finally cozy :)

Oscar and Trixie enjoying the much warmer, more accessible and LARGER terracotta (14") water tray:

DSC_0674.jpg


Mist time (Brock):

DSC_0678.jpg


You can see that the substrate is nice and thick. It was 4" at best and 0" in half the table before. Now its minimum 2" majority 3" and some parts are 5-6" :) Yay borrowing!

DSC_0680.jpg


Oscar peeking out- Oscar is full grown so you can see just how large Biggie is (left side)!

DSC_0682.jpg


On to the next improvement... What can I build or make cheaply that will keep the humidity in but not get melted or overheated by the lights?

Any other constructive criticisms are appreciated :D
 

ascott

Well-Known Member
10 Year Member!
Joined
Apr 10, 2011
Messages
16,109
Location (City and/or State)
Apple Valley, California
That is FRICKEN SWEEEEET !!! Nice job....and as far as the top? perhaps you can build a wood frame and then have some plexiglass cut to fit in that wood frame, attach it with a hinge or two so you can lift and close it as needed...and this can be done for half or three quarters of the top????
 

karlyholmes

Member
5 Year Member
Joined
May 30, 2012
Messages
98
ascott said:
That is FRICKEN SWEEEEET !!! Nice job....and as far as the top? perhaps you can build a wood frame and then have some plexiglass cut to fit in that wood frame, attach it with a hinge or two so you can lift and close it as needed...and this can be done for half or three quarters of the top????

Thank you so much! Do you think the plexi will work? Any idea about the cost of it?
 

ascott

Well-Known Member
10 Year Member!
Joined
Apr 10, 2011
Messages
16,109
Location (City and/or State)
Apple Valley, California
http://www.google.com/#hl=en&sclien...j0i10.1753.3558.0.7636.5.5.0.0.0.0.640.2435.3

I went in and googled it....here is that page, perhaps you can better see what the cost would be by what you would design to use it....or, let me share with you what I have on one of my RFs tanks as the top...a little hill billy redneck, but hell, what can I say?

I have a glass tank and I cover about 3/4 of the top, so what I have is a thick piece of chicken wire... that is cut and edges folded onto itself so no sharp edges (well, not too many)...then I have taken a while plastic trash bag and slipped that entire piece into the bag, then pulled the bag snug and tight and then duct taped it tight and lay it right on top of the tank with a little weight on top to press it against the tank top edges...works well....

You can do something like this on a larger scale and use the black hefty bags as they are bigger and this would likely cost you less than 10.00 bucks, unless of course you have all the stuff laying around like I did....lol :D
 

karlyholmes

Member
5 Year Member
Joined
May 30, 2012
Messages
98
ascott said:
http://www.google.com/#hl=en&sclien...j0i10.1753.3558.0.7636.5.5.0.0.0.0.640.2435.3

I went in and googled it....here is that page, perhaps you can better see what the cost would be by what you would design to use it....or, let me share with you what I have on one of my RFs tanks as the top...a little hill billy redneck, but hell, what can I say?

I have a glass tank and I cover about 3/4 of the top, so what I have is a thick piece of chicken wire... that is cut and edges folded onto itself so no sharp edges (well, not too many)...then I have taken a while plastic trash bag and slipped that entire piece into the bag, then pulled the bag snug and tight and then duct taped it tight and lay it right on top of the tank with a little weight on top to press it against the tank top edges...works well....

You can do something like this on a larger scale and use the black hefty bags as they are bigger and this would likely cost you less than 10.00 bucks, unless of course you have all the stuff laying around like I did....lol :D

Thats a pretty good idea! I could take the baby gates I already have, put them in black hefty bags and tape with black duct tape. Nice and cheap I like it ;)
 

lynnedit

Well-Known Member
10 Year Member!
Joined
Feb 25, 2011
Messages
5,730
Location (City and/or State)
Southwest Washington
You might want to zip tie or duct tape clear plastic (instead of black) to your gates, so light can penetrate.
Just leave an opening under where the lights are.
 

karlyholmes

Member
5 Year Member
Joined
May 30, 2012
Messages
98
*Update* As of today, the table now has a baby gate on both ends which both have sheet plastic duct taped tightly to the entire bottom surface! Im hoping this helps keep it humid and happy :)
 

karlyholmes

Member
5 Year Member
Joined
May 30, 2012
Messages
98
After the lids were plastic lined and 3 more blocks of coco added the humidity is now 80%+!!! Turtles seem very pleased and burrow deep into the coco. Even Biggie who hasn't burrowed in a hide in the past is now frequently burying herself as well which helps with her eyes. I keep their food hi in beta carotene and their temp up- she's the only one who had a problem with the thick gunk eyes and I do believe it was from low humidity and her not burrowing like the other 4. If she basks for hours, they get a little sticky and I mist her a bit then they seem fine. Hopefully now that she burrows it will resolve. Thanks for you help!
 
Status
Not open for further replies.

New Posts

Top