- Joined
- Apr 23, 2015
- Messages
- 270
Hi all!
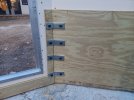
I'm finally working on a pond at our new house here in Albuquerque, NM. The excavation is done and I'm currently working on getting concrete footings poured for the walls. The pond will be basically a 20' x 10' square with dog ears in opposite corners. The walls will be ~2.5' tall and constructed from 2x lumber resting internally against rebar embedded in the footings on ~30" spacing. The horizontal boards will also be screwed into vertical 4x6s which will encase the rebar so that any forces would have to cantilever the 4x6 on its long edge and bend rebar. The footing and walls are about 12" below grade and the pond is excavated to ~3' beyond that, so a total height of 5' in the deep areas and 2.5' deep in the shallow areas. I'll probably have a ramp to a relatively large basking area so that there are areas that are in the neighborhood of 1' deep too. In the picture below I havn't yet backfilled and tamped the dirt in for the footing from where I over excavated (p.s. driving an excavator is a ton of fun....). As you may have guessed from the lumber construction rather than CMU, I'm going with EPDM liner rather than a concrete shell. I may revisit in a decade or so, we'll see. I also plan to have 2 windows which are ~5' x 2' mounted in aluminum Z-bar, one in the long edge and one in the dog ear which are on the far side of the picture (facing the house).
The current plan when I finish, hopefully in August or so, is to get some Bluegill and similar fish and move a couple of my turtles from indoors (180 gallon tank with 1 southern painted, 1 razorback musk, and 4 Mississippi maps) to the outdoor tank.
This brings me to my first big question. I'd like to have all native turtles in the pond, here in New Mexico which according to the all-knowing internet (definitely sarcasm) includes: Big Bend Slider, Midland Smooth Softshell, Eastern Spiny Softshell, Sonora Mud Turtle, Yellow Mud Turtle, Rio Grande Cooter, and the Western Painted.
The plan will be to get hatchlings and grow them out in the indoor aquarium for a couple years before transferring outside. I'm also strongly considering getting a couple adults immediately.
Does anyone have any recommendations for (a) which turtles specifically to aim for and (b) a reputable breeder from which to get said turtles?
I look forward hearing people's thoughts and I'll share more details as the build progresses!

P.S. If the mods think this is more suited to enclosures than water turtles, feel free to move it. I figured ponds and water turtle related things were more niche than enclosures in general so I'd put it where a more focused audience would see it.
I'm finally working on a pond at our new house here in Albuquerque, NM. The excavation is done and I'm currently working on getting concrete footings poured for the walls. The pond will be basically a 20' x 10' square with dog ears in opposite corners. The walls will be ~2.5' tall and constructed from 2x lumber resting internally against rebar embedded in the footings on ~30" spacing. The horizontal boards will also be screwed into vertical 4x6s which will encase the rebar so that any forces would have to cantilever the 4x6 on its long edge and bend rebar. The footing and walls are about 12" below grade and the pond is excavated to ~3' beyond that, so a total height of 5' in the deep areas and 2.5' deep in the shallow areas. I'll probably have a ramp to a relatively large basking area so that there are areas that are in the neighborhood of 1' deep too. In the picture below I havn't yet backfilled and tamped the dirt in for the footing from where I over excavated (p.s. driving an excavator is a ton of fun....). As you may have guessed from the lumber construction rather than CMU, I'm going with EPDM liner rather than a concrete shell. I may revisit in a decade or so, we'll see. I also plan to have 2 windows which are ~5' x 2' mounted in aluminum Z-bar, one in the long edge and one in the dog ear which are on the far side of the picture (facing the house).
The current plan when I finish, hopefully in August or so, is to get some Bluegill and similar fish and move a couple of my turtles from indoors (180 gallon tank with 1 southern painted, 1 razorback musk, and 4 Mississippi maps) to the outdoor tank.
This brings me to my first big question. I'd like to have all native turtles in the pond, here in New Mexico which according to the all-knowing internet (definitely sarcasm) includes: Big Bend Slider, Midland Smooth Softshell, Eastern Spiny Softshell, Sonora Mud Turtle, Yellow Mud Turtle, Rio Grande Cooter, and the Western Painted.
The plan will be to get hatchlings and grow them out in the indoor aquarium for a couple years before transferring outside. I'm also strongly considering getting a couple adults immediately.
Does anyone have any recommendations for (a) which turtles specifically to aim for and (b) a reputable breeder from which to get said turtles?
I look forward hearing people's thoughts and I'll share more details as the build progresses!
P.S. If the mods think this is more suited to enclosures than water turtles, feel free to move it. I figured ponds and water turtle related things were more niche than enclosures in general so I'd put it where a more focused audience would see it.