RedFoot Enclosure Update

theguy67

Well-Known Member
10 Year Member!
Joined
Sep 13, 2009
Messages
583
My enclosure is going on it's 3rd year and would like to provide an update for those who are looking for ideas. I installed automated sprinklers a few days ago, so now have 4 rain showers programed daily during the summer.

pretortoise1-jpg.144477

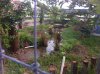
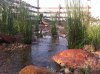
The above pic was taken during it's first year. Not much going on, but they still were able to use it while I worked on it.
last-year-tortoise1-jpg.144483

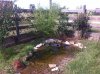
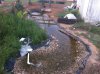
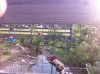
Taken last year. The grass was finally filling out.

tortoise1-jpg.144479

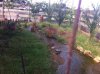
This was taken this morning.
tortoise3-jpg.144480

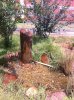
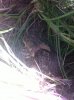
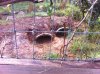
Being in texas, it gets very hot and dry. Although redfoots are not burrowers, they definitely enjoy these 2 I put in, and their shells have improved as well.

Let me know what you think! I'll post some more pics later, and I'll try to get a herd shot when they are out feeding this evening.
 

Attachments

  • pretortoise1.jpg
    pretortoise1.jpg
    329.9 KB · Views: 1,400
  • tortoise1.jpg
    tortoise1.jpg
    173.5 KB · Views: 1,368
  • tortoise3.jpg
    tortoise3.jpg
    156.9 KB · Views: 1,367
  • last year tortoise1.jpg
    last year tortoise1.jpg
    134.9 KB · Views: 1,362
Last edited:

theguy67

Well-Known Member
10 Year Member!
Joined
Sep 13, 2009
Messages
583
Any RF would be lucky to have such an oasis. How many does this house?
Thanks! There are 5 in there currently. There is also a room where they stay in the winter, which they have access to in the summer through a tortoise door, but it's nothing more than a dirt floor. So, there is room for expansion in the future if I wanted to, but 5 is a good number for now.

I'll try to get some different angles once it cools down today. Hopefully next year I can add some different ground cover for variety.
 

theguy67

Well-Known Member
10 Year Member!
Joined
Sep 13, 2009
Messages
583
MORE PICS!

foutain-jpg.144499


Here is a closer look at the faux stone fountain. Made it myself, along with all of the red rocks. Sometimes the tortoises will lay next to it, allowing the water to role over their shells.

pond-jpg.144500

Pond side. Its not quite designed for fish, as I wanted to reduce risk of drowning. From my experience it's more about slope than depth, since most tortoises can "swim", or float, but the pen wasn't large enough to accommodate a beach, and I couldn't justify taking up so much room that the tortoises would not use.
bigmale-jpg.144501

The big male was out investigating my presence.
 

Attachments

  • foutain.jpg
    foutain.jpg
    185.5 KB · Views: 1,114
  • pond.jpg
    pond.jpg
    172.8 KB · Views: 1,107
  • bigmale.jpg
    bigmale.jpg
    147.2 KB · Views: 1,101
  • rabbit.jpg
    rabbit.jpg
    76.2 KB · Views: 109

richosullivan

Well-Known Member
5 Year Member
Joined
Feb 26, 2014
Messages
182
Location (City and/or State)
Orlando
On the pond side, it looks like you have an overflow drain, does that drain out through the bottom, or does it run out sideways once it goes underwater (assume it is a french drain of some sort?).
 

theguy67

Well-Known Member
10 Year Member!
Joined
Sep 13, 2009
Messages
583
Thank you everyone for the kind words. It has been a fun experience to watch it grow into something, and it still has a ways to go.


On the pond side, it looks like you have an overflow drain, does that drain out through the bottom, or does it run out sideways once it goes underwater (assume it is a french drain of some sort?).

Are you referring to the cylinder in the middle? That houses the pump. I know, not the prettiest. I couldn't really have a skimmer style pump-box since the water level is not always stable, like in the dead of summer. I will probably make a pump box for it in the corner (by the willow) under the large piece of limestone.

I always enjoy questions if anyone is curious of how certain things were done.

rocks-jpg.144632


I'll give away the secret behind the rocks (not even sure if its a secret?). I spent maybe $50.00 on making the rocks and the fountain (minus the pump). I created a basic shape I wanted with dirt, clay, or trash (concrete rubble, broken pottery, etc.), Then I poured only Portland cement over the shape, not concrete , mixed to a mud consistency so it still holds firm, and doesn't run. The rest just requires a cement trial, and a history making mud pies as a kid. Once cured, I dyed the "stone" with iron sulfate fertilizer, and then placed wet coffee grounds to create darker patterns on the surface. They were all covered with a clear finish (non "shinny" kind) to preserve the dye. I looked into concrete dyes before this and realized how expensive they can be. There are other fertilizers and water soluble stains to be experimented with if you want other colors.

The only thing different with the fountain is that I used rabbit wire rolled into a cylinder for the frame.

The above picture provides some idea, although the rock on the right is rough. A better representation would be the one directly across the stream, or the flat stone in the previous picture. Its such a simple process, and they look decent in person. Everyone that has seen them has asked where I bought the rock from, it certainly fools people.
 

Attachments

  • rocks.jpg
    rocks.jpg
    142.8 KB · Views: 1,094
Last edited:

richosullivan

Well-Known Member
5 Year Member
Joined
Feb 26, 2014
Messages
182
Location (City and/or State)
Orlando
Thank you everyone for the kind words. It has been a fun experience to watch it grow into something, and it still has a ways to go.

Are you referring to the cylinder in the middle? That houses the pump. I know, not the prettiest. I couldn't really have a skimmer style pump-box since the water level is not always stable, like in the dead of summer. I will probably make a pump box for it in the corner (by the willow) under the large piece of limestone.

I always enjoy questions if anyone is curious of how certain things were done.

rocks-jpg.144632


I'll give away the secret behind the rocks (not even sure if its a secret?). I spent maybe $50.00 on making the rocks and the fountain (minus the pump). I created a basic shape I wanted with dirt, clay, or trash (concrete rubble, broken pottery, etc.), Then I poured only Portland cement over the shape, not concrete , mixed to a mud consistency so it still holds firm, and doesn't run. The rest just requires a cement trial, and a history making mud pies as a kid. Once cured, I dyed the "stone" with iron sulfate fertilizer, and then placed wet coffee grounds to create darker patterns on the surface. They were all covered with a clear finish (non "shinny" kind) to preserve the dye. I looked into concrete dyes before this and realized how expensive they can be. There are other fertilizers and water soluble stains to be experimented with if you want other colors.

The only thing different with the fountain is that I used rabbit wire rolled into a cylinder for the frame.

The above picture provides some idea, although the rock on the right is rough. A better representation would be the one directly across the stream, or the flat stone in the previous picture. Its such a simple process, and they look decent in person. Everyone that has seen them has asked where I bought the rock from, it certainly fools people.


Got it, that was what I was referencing. What size pump are you using?
 

theguy67

Well-Known Member
10 Year Member!
Joined
Sep 13, 2009
Messages
583
Got it, that was what I was referencing. What size pump are you using?

It is a 1500gph pump. Not sure what kind, I just picked the best and cheapest one on ebay. I always want more flow, but I have come to accept the amount of flow I have. The water moves nicely, and I suppose proportionally for it's size. Its not a very big stream, so no need to have a rushing current. My biggest mistake was not bringing in dirt, and manipulating the elevations until after I put the liner in. Although this would had been more work, I could have created a few water falls. Not really a design flaw, just lead to a different look which turned out well. I like the creek appearance.
 

New Posts

Top