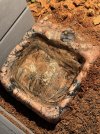
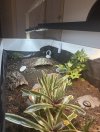
My sulcata tortoise was chilling in his water bowl enclosure when i noticed that there was this white powder in the bowl when my tortoise left. Is this normal?
Yes, that is urates
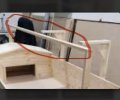
However, that bowl should not be used. They need a clay saucer one they can fit into and not have to climb up to.
The urates need to be like a tooth paste texture. If they are powdery or gritty or hard chunks your tortoise is dehydrated.
Your tortoise is also starting to pyramid and needs high humidity of 80% in a closed chamber enclosure.
My sulcata tortoise was chilling in his water bowl enclosure when i noticed that there was this white powder in the bowl when my tortoise left. Is this normal?
Your tortoise is forming urates. This means it is too dehydrated. You need to soak in warm water in a tall sided opaque tub for 30-40 minutes a day for at least a couple of weeks, and then start skipping days now and then.
Your substrate is also much too dry. Is there a humid hide?
Sulcatas are not desert animals, as many sources incorrectly indicate. They hatch into the hot, humid, wet, rainy, monsoon season in the wild, and these are the conditions they need in our captive environments as babies and small juveniles.
I agree with Wellington about the bowl. Those ramped bowls are great for lizards and snakes, but they are dangerous and should not be used for tortoises. Use a terra cotta saucer from the hardware store sunk into the substrate for food and water.
Hello and welcome to tortoiseforum.org! We are all glad you are here! There is no other forum like this anywhere. We have tens of thousands of members from all over the world ranging from kids with their first tortoise to people who have been breeding and keeping high end tortoises since the...
I chose the title of this care sheet very carefully. Are there other ways to raise babies? Yes. Yes there are, but those ways are not as good. What follows is the BEST way, according to 30 years of research and experimentation with hundreds of babies of many species. Babies hatch during the...
Hello and welcome! The urates may be forming due to the dry conditions like Tom suggests.
I’m going to include some information below on how I’d personally tackle an indoor starter set up for this guy until they’re bigger. Hopefully it helps give you some ideas!
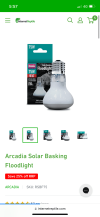
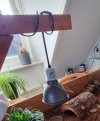
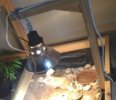
Basking light should be an incandescent floodlight(example attached) on a 12 hour timer.
Basking temperature directly under the floodlight should be 95-100f. The rest of the enclosure should be ranging 80-85, not dropping lower than 80 at night all over.
You may also wish to add ambient lighting on the same timer as the basking light, providing shady areas with hides and such.
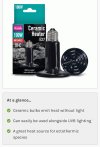
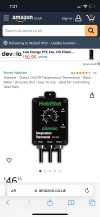
If the floodlight isn’t enough to bump up the over enclosure temperature, you could add a CHE(ceramic heat emitter)or two depending on the size you go for, they’re a non light emitting heat bulb that people use to help make heat up/night heat. Again if it’s dropping below the 80’s at night, a CHE is a good idea. Always run any ceramic bulbs on a thermostat, you’ll set the thermostat for around 80, plug the ceramic(s) into the thermostat and plug the thermostat into the mains, it’ll be on 24/7, but the thermostat will only turn on the ceramic(s) if the temperature drops below 80, and will keep them off if the temperature is fine.
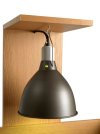
Dome fittings do help in projecting the heat down, just make sure to never solely rely on the clamp fittings that can come with them, they can fail, so it’s always best to hang them securely
Indoor Uv should be a t5 fluorescent tube, avoid the compact and coil uv bulbs, they don’t give out enough uv and can hurt the tortoises eyes. The uv can be on a 4 hour timer from noon. I’ve attached examples of the brands to go for, the reptisun is just the bulb and need the hood purchased separately, the Arcadia comes with the fitting.
With lighting always avoid anything labelled halogen or mercury vapour.
For substrates, either coco coir, dampened and packed down by hand as a base, with a layer of orchid(fir not pine) bark or forest floor on top, or just the orchid bark/forest floor. Never use anything with sand mixed in, no top soils and no kinds of moss. The trouble with top soil is you don’t know what kind of plants have gone into it, they could be toxic. Sand and moss are impaction risks.
You want to aim to have the bottom layer of substrate damp, to do this pour lukewarm water into the corners, not loads but enough to dampen the entire bottom layer. To stop that top layer getting too dry/dusty, mix the substrate now n then, which also helps boosting humidity or give the top a spray. Check your monitors and substrate to do the pours as and when needed. I don’t recommend misters or foggers, they get the air too wet and cause respiratory problems.
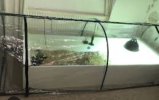
Humidity for young growing tortoises benefits when maintained around 80+, 24/7, you’ll find that difficult to achieve with an open top, for the set up I’m recommending I’d get a greenhouse cover.
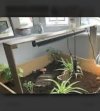
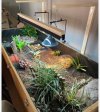
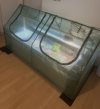
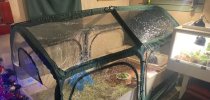
To maintain humidity whilst the tortoise is younger a greenhouse style set up works well and provides more space, the bigger you go the better, it’s ideal if you can build your own base to go as big as you can for the room you have for now.
If you can’t find an exact fit for your base with the cover, then place it over like the one with the white base in the photo, I’d put lining down under the base and cover though to stop condensate getting on your floor. Bear in mind the ones pictured I don’t think are personally big enough to house this tortoise for long, they’re just to give you an idea.
When making your base, just make sure the material is safe, some use flower beds or just make their own, for both these options I’d line with cheap pond liner to protect the base, making sure the liner goes up the sides too and make sure those sides are deep enough to prevent escapes.
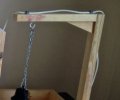
Some people even hang their lighting from the greenhouse frame! Simply wrap the wire round so it’s at the height you need(check with temp gun/put thermostat in, 18-21 inches for uv I recommend) then secure with cable ties and chains.
I’ve also included examples of stands people make/buy.
for the size you’ll need to go, you may struggle to find a topper, in that case you could maybe throw some pvc covering over the stands if you can’t find one, but again if you do that, I’d put lining down under the base to stop condensate.
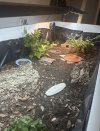
For a water dish a shallow terracotta saucer large enough for the tortoise to soak in, is considered safest, they have grip in the event your tortoise flips themselves, most pet store options are a known hazard like the one in use.
Ignore whatever else is in these enclosures in the photos, they’re just to give you an idea, and again these particular ones look too small for the species imo to last long, but hopefully they help inspire an idea
I’d also always recommend getting your hands on a temp gun, they’re SO handy when setting up a new environment or for checking your monitors are correct
As this is a closed chamber set up, I’d recommend letting the materials off gas for about a week or until there is no odour