- Joined
- Apr 23, 2015
- Messages
- 270
Its been about two weeks since I updated and it has been a stressful couple weeks! I got the liner in with the help of some friends and then in classic me fashion I got a little ahead of myself. Long story short, I thought I had the liner with plenty of slack everywhere and so affixed the bottom drain and cut a hole for the smaller window. As I started looking at it further after I had used Lexel and screwed in the bottom drains and cut the hole for the window I realized the liner was actually pretty taut in a couple places. What followed was a week of moving the liner, back filling with some dirt, lining the up the window and eventually filling the pond to the bottom of the windows to check. After filling and draining 3 times I finally had it in a place where I was happy.
All of that finished, I was able to get the top mostly on, finish and test the filtration box, and stage the stock tank bog filters for overflow/waterfall.
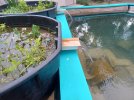
Below is the liner in with the windows lexel'd in place and the pond filled up to the concrete, just below the windows. The bottom drain on the left is ~6" deep and the drain in the middle is ~3' deep right now. That will be ~2.5' and 5' once its filled all the way. The windows are acrylic and sandwiched between the Z-bar and a bracket panel. There is a thick bead of Lexel on the front and back side of the acrylic as well as the bolts for the brackets. When I have the final brackets on I'll be ready to fill the pond and test for leaks.

The teal toppers provide additional rigidity towards bending. Final steps with those are to attach the 2 missing pieces (the diagonal corners) and then trim and tack the excess liner to the underside for a clean look. The dirt on the white lumber is due to rain causing dirt to jump up. I'll clean it and fill in with gravel/crushed rock around the bottom when the build is done.


The filtration consists of those 2 4" bottom drains and the skimmer. The valves on the left side are overflow to set the pond water level and a drain for draining to ground level. The filter box is a rectangle and has the returns on one side and the pump on the other with spaces for the matala pads for prefiltration. The design is heavily inspired by the concrete filter box in @Markw84 's build.
The small box with the red pump has the air pump and the Bell Gossett pump that Mark recommended in his build for pushing the water into the 2 stock tanks and UV for overflow waterfall return. Those still need the be plumbed and have their stone and plants put in.


One final note. I couldn't think of a way to use the skimmer box that I built and be confident in the seal for the liner, so I just bought a skimmer off of amazon designed for above-ground pools.


On to the final steps! Finish the topper, finish the filtration, rocks and such to make the basking and shallow water areas and then fill it up! I may beat my deadline after all. My wife is due with our first kid in 3 weeks, so it could really be any day now. I'm trying to finish up ahead of kiddo arriving, but things may get delayed for a bit. Only time will tell!
All of that finished, I was able to get the top mostly on, finish and test the filtration box, and stage the stock tank bog filters for overflow/waterfall.
Below is the liner in with the windows lexel'd in place and the pond filled up to the concrete, just below the windows. The bottom drain on the left is ~6" deep and the drain in the middle is ~3' deep right now. That will be ~2.5' and 5' once its filled all the way. The windows are acrylic and sandwiched between the Z-bar and a bracket panel. There is a thick bead of Lexel on the front and back side of the acrylic as well as the bolts for the brackets. When I have the final brackets on I'll be ready to fill the pond and test for leaks.
The teal toppers provide additional rigidity towards bending. Final steps with those are to attach the 2 missing pieces (the diagonal corners) and then trim and tack the excess liner to the underside for a clean look. The dirt on the white lumber is due to rain causing dirt to jump up. I'll clean it and fill in with gravel/crushed rock around the bottom when the build is done.
The filtration consists of those 2 4" bottom drains and the skimmer. The valves on the left side are overflow to set the pond water level and a drain for draining to ground level. The filter box is a rectangle and has the returns on one side and the pump on the other with spaces for the matala pads for prefiltration. The design is heavily inspired by the concrete filter box in @Markw84 's build.
The small box with the red pump has the air pump and the Bell Gossett pump that Mark recommended in his build for pushing the water into the 2 stock tanks and UV for overflow waterfall return. Those still need the be plumbed and have their stone and plants put in.
One final note. I couldn't think of a way to use the skimmer box that I built and be confident in the seal for the liner, so I just bought a skimmer off of amazon designed for above-ground pools.
On to the final steps! Finish the topper, finish the filtration, rocks and such to make the basking and shallow water areas and then fill it up! I may beat my deadline after all. My wife is due with our first kid in 3 weeks, so it could really be any day now. I'm trying to finish up ahead of kiddo arriving, but things may get delayed for a bit. Only time will tell!


") ) I'll keep that as a point to fix. What would will the CMU blocks with for stability? Mortar or more concrete?
) I'll keep that as a point to fix. What would will the CMU blocks with for stability? Mortar or more concrete?