Something going on there for sure.....does this turtle have a dry basking spot to climb out onto and basking light above....this is absolutely necessary for a turtle to be able to completely dry out their shell to maintain the shells health....?
If it were me, I would make sure that there is a dry/basking dock available and that the space is easily accessible to the turtle....if you want to let the turtle dry out some for a couple of days you can do that as well, however, remember when it comes to feeding time the turtle must be in water in order to eat....
WARNING: If your turtle has any signs of pus or sticky wet areas on the damaged shell, take the animal to an experienced exotic animal veterinarian without delay. The same is true if large areas of the shell show effects of infection, or if you see reddened areas under the scutes. Advanced infections of these types may require extensive debriding and antibiotic injections in order for the animal to survive. It is not advisable to waste time on home treatment, as this is a life-and-death situation. Additionally, home treatment can make it more difficult for the veterinarian to determine the exact nature of the pathogen, which can create problems in deciding which antibiotics will be most effective. If your turtle seems to have only small areas of mild shell rot, but is lethargic, not eating, has puffy eyes or any other signs of illness along with the minor shell lesions, there is probably widespread infection of some unknown nature, and this should be treated by a veterinarian. If you have any doubt about the severity of the shell condition or overall health of the turtle, go to a veterinarian.
CAVEAT: While I have had excellent results using this treatment, I do not make any guarantees. If your turtle's shell condition does not respond to treatment, consult a veterinarian.
Mild shell rot which can be expected to respond well to home treatment will have several characteristics:
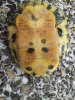
1. Only small areas will show effects of infection and the injury will not be deep;
2. The lesions will be dry with no evidence of draining pus or soft areas;
3. There is usually a whitish, crusty deposit in the pits or lesions, that looks like part of the shell;
4. The turtle will be active, clear eyed, and eating well, displaying no other signs of illness.
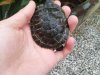
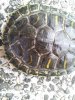
This type of minor shell damage is common among wild semi-aquatic turtles. When the shell of an older individual is examined, one sees many small pits from old lesions. During times of cloudy, wet weather and little sun, a variety of pathogens can take hold and damage the outer layer of the shell. When the turtle finally gets a chance to bask in the sun, the condition will usually clear up, leaving a small pit, but otherwise causing no long-term harm. With captive animals, the problem can become long term, because of incorrect care. The few individuals with which I am familiar who had the lesions cultured had evidence of bacterial infection, not fungal. But there are many different pathogens that could be associated with these minor, shallow infections.
TREATMENT:
Step 1: Correct the cause of the problem. For turtles who live in captivity, poor conditions will cause shell rot. Dirty water, and lack of appropriate basking area and light are the most likely culprits. If your turtle has developed shell rot in your care, the first step is to correct your husbandry. Extensive information is available on correct care of a wide variety of species, on the internet and in books. Once you have corrected your turtle's housing, you may turn you attention to the shell condition.
Step 2: Clean the turtle's shell. Using a soft toothbrush and mild soap, clean off any dirt, algae and damaged pieces of the outer layers of the scutes. After the bath, dry the turtle off as thoroughly as possible. Gently peel off anything that will come off easily. Try to scrape out the white pits. If they do not come out easily, leave them in place. Further treatment will loosen them up. The small white spots often come out easily when the turtle is completely dry, even if they stay stubbornly in place while wet. Scrape them with the edge of a clean, old credit card or some other plastic utensil. Do not use a knife. The infected material needs to be removed so that the treatment can reach the tissue below it. Large areas and deep infections should only be cleaned by an experienced veterinarian. Extensive debriding is incredibly painful for the animal and should be done under anesthesia.
Step 3: Disinfect the shell with a general antiseptic. In years past, antiseptics such as hydrogen peroxide or Betadine (povidone-iodine) or antibiotic ointments have been used. These will generally kill the pathogens successfully, however recent research indicates that these things actually slow the healing process by preventing the regrowth of the epithelial cells over the damaged area. The antiseptic of choice is often Nolvasan (chlorhexidine) which is available from veterinary clinics (non-prescription), some pet stores and herp supply stores on the internet. Healing is noticably quicker with Nolvasan, so it is worth the effort to find some and use it. Nolvasan liquid solution is generally made with one part Nolvasan, 100 parts water. (Read the directions on the bottle.) If you cannot find chlorhexidine, povidone-iodine can be used successfully, even it it takes a little bit longer to heal completely. If there are just a few discolored areas, swab those areas with the weak antiseptic solution. Reapply the solution every ten minutes or so for about a half-hour. If there are a large number of tiny discolored areas, it might work better to soak the turtle. If you choose to soak, make the liquid shallow enough for the turtle to easily hold its head up out of the water, because any antiseptic, even Nolvasan, can cause some minor eye irritation. A follow-up application of silver sulfadiazine cream can be beneficial, however SSD cream is available by prescription only in the US.
Step 4: Air! Place the turtle in a dry container for at least 2 hours. Some turtles are not overly stressed if left in the dry container overnight (in complete darkness), returning it to the aquarium for at least a portion of the day. Air is the enemy of shell rot pathogens, so it is important to keep the animal dry for a lengthy period of time. But dehydration and excessive stress must also be prevented. So the turtle MUST spend some time each day in water.
Continue to clean, disinfect and air dry the turtle each day for a 5 to 7 days. By that time, all the white pits will have loosened and been removed. If not, continue treatment.You will need to remove all the whitened material to get to the healthy shell underneath, so that it can heal and grow normally. If there are discolored areas remaining after 2 weeks, consult a veterinarian.
When the turtle has been returned to the aquarium full time, it is vital that you maintain conditions that will prevent a recurrence. Keep the water clean. Provide a dry area with a warming light for basking. Natural healing will continue until the damaged areas are filled in (or nearly) with new epithial cells.
")