BEGINNING TO END (MY NEW ENCLOSURE) :)

Status
Not open for further replies.

ILoveTortoises2

Member
5 Year Member
Joined
Jul 18, 2013
Messages
479
Location (City and/or State)
Mansfield, Ma
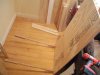
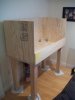
So Yesterday I went out to get ALL the items I needed for my NEW enclosure I'm building. So I wanted to do a BEGINNING TO END thread to see the progress that I have done. :)
I think I am doing a great job for my FIRST time building something like this on my OWN. :)
I hope this helps ppl with some idea's when they want to make an indoor enclosure :)

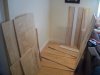
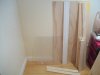
ITEMS I BOUGHT FOR THE ENCLOSURE...............

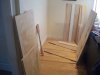
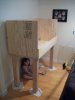
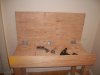
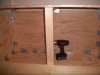
3 pieces of plywood that are 4' Feet BY 2' Feet. (FOR THE TOP, BACK & BOTTOM)
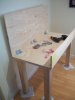
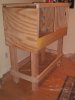
I have another 4' Feet BY 2' Feet for the table that the enclosure will be on.
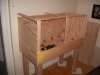
2 - 2' Feet X 2' Feet for the sides. (Put wholes in the sides so there is air floor.)
6 - 2" to 3" inch X 2' Feet for the plastic doors to lay on when closing the doors.
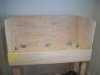
1 - 4' Feet X 10" that will go in the front at the bottom so the soil doesn't fall out of the enclosure.
2 - 24" X 18" Plastic Glass that will the doors to open.
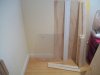
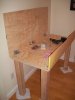
4 - 31" wooden legs for the table
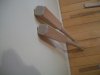
I also bought 1" inch screws & those hooks so that I can hand the lights inside of the enclosure. Also those things that go under the legs of the table they don't scratch yout floor. Forgot what they were called LoL sorry but you probably know what I'm talking about :)
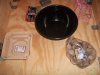
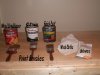
I bought 3 bags of soil. I probably don't need this much but I'm also going to grow some grass for probably 75% of the ground. I bought lettuce that is already planted. I'm also putting a small but not to small water bowl that till ave rocks in it and my fogger in it. I have a visual on what I want so I'm HOPING it comes out as I want it.

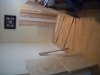
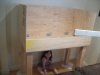
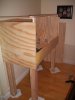
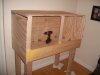
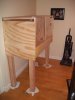
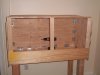
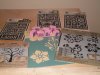
So here are the photos of ALL the pieces I have bought yesterday. I'll take more photos as I do this enclosure. :)
 

Attachments

  • 100_1929.JPG
    100_1929.JPG
    1.1 MB · Views: 374
  • 100_1930.JPG
    100_1930.JPG
    1.1 MB · Views: 303
  • 100_1931.JPG
    100_1931.JPG
    945.9 KB · Views: 288
  • 100_1932.JPG
    100_1932.JPG
    1,007.9 KB · Views: 285
  • 100_1933.JPG
    100_1933.JPG
    995.8 KB · Views: 265
  • 100_1934.JPG
    100_1934.JPG
    1,000.8 KB · Views: 259
  • 100_1935.JPG
    100_1935.JPG
    1.3 MB · Views: 263
  • 100_1936.JPG
    100_1936.JPG
    967.7 KB · Views: 377

ILoveTortoises2

Member
5 Year Member
Joined
Jul 18, 2013
Messages
479
Location (City and/or State)
Mansfield, Ma
I new I could do it. I was just worried I couldn't do it by myself. BUT I was wrong.
So the only thing I need to figure out how to do is putting holes in the sides of the enclosure. I don't know what to use that will make the holes big enough & not look like crap. Any idea's on this?
 

Irish

Member
5 Year Member
Joined
Aug 8, 2013
Messages
212
Location (City and/or State)
Orlando Florida
You will feel so good when finished. It does something profound to see a task through to completion and see your pet thriving.
 

ILoveTortoises2

Member
5 Year Member
Joined
Jul 18, 2013
Messages
479
Location (City and/or State)
Mansfield, Ma
Well not all over the place just a couple of holes on each side. It will be for air floor. OR should I not do that?
 

samsmom

Active Member
10 Year Member!
Tortoise Club
Platinum Tortoise Club
Joined
Oct 3, 2012
Messages
456
Location (City and/or State)
CedarCreekLake, Texas
i don't have any! i open the top several times a day and it is not completely air tight either! you might not need any!
 

N2TORTS

Well-Known Member
5 Year Member
Joined
Feb 21, 2010
Messages
8,803
K'..... depending on what size holes you want ...there are two easy ways to accomplish this. Say for up to 1 7/8" you can use a " spade bit" ....hooks to your cordless/or corded drill and will give you a nice clean hole. Now if going bigger ... you can use a " hole saw bit" this also attaches to your drill ...but when done cutting you will have a " plug" inside your bit. These two by far are the easiest and most cost effective....both bits can be bought at your local hardware/Big Box store. ....Both bits will run you under 10 bucks...
Happy Building .......!
JD~:)
 

ILoveTortoises2

Member
5 Year Member
Joined
Jul 18, 2013
Messages
479
Location (City and/or State)
Mansfield, Ma
Ok so I bought these LITTLE legs for the table part and O.M.G they were sooooooo wobblie you will need legs that are THICK. Because if you don't it will wobble all around. It was NOT safe with EVERYTHING around it and with children near SO please make sure to get THICK legs that will NOT be so wobblie. So just wanted ppl to know the mistakes I have learned from. :)
I will be working on this enclosure more today. So I will show some more pictures later :)
 

ILoveTortoises2

Member
5 Year Member
Joined
Jul 18, 2013
Messages
479
Location (City and/or State)
Mansfield, Ma
Ok so I have been to Home-Depot about 50 times within 4 days. I think I have EVERYTHING down now.. LOL
So I needed the brackets to put on each end so that the enclosure can hold MUCH better. So I had to get a lot of them because I put like 3 or 4 of them on EACH side, back & front. So then I got the WRONG size screws acouple of times which drove me NUTS. I also found some nice rocks and a nice black bowl type thing. Where I will be putting into my enclosure so that I can put my fogger into it. I actually got 2 different kinds to see which one works better. So if this works anyone can do it. :)
So here is the table done and the enclosure on top of it and working like this.
 

Attachments

  • 100_1939.JPG
    100_1939.JPG
    1.1 MB · Views: 227
  • 100_1941.JPG
    100_1941.JPG
    950.4 KB · Views: 199
  • 100_1942.JPG
    100_1942.JPG
    1.1 MB · Views: 183
  • 100_1944.JPG
    100_1944.JPG
    992.8 KB · Views: 183
  • 100_1945.JPG
    100_1945.JPG
    1 MB · Views: 175
  • 100_1946.JPG
    100_1946.JPG
    935.9 KB · Views: 194
  • 100_1947.JPG
    100_1947.JPG
    1 MB · Views: 206
  • 100_1949.JPG
    100_1949.JPG
    1.3 MB · Views: 214

IBeenEasy

Active Member
5 Year Member
Joined
Jul 16, 2013
Messages
295
Location (City and/or State)
Massachusetts
the table came out great..see ya had nothing to worrie about!! and your daughter is such a lil cutie!! haha shes under the table
 

ILoveTortoises2

Member
5 Year Member
Joined
Jul 18, 2013
Messages
479
Location (City and/or State)
Mansfield, Ma
IBeenEasy said:
the table came out great..see ya had nothing to worrie about!! and your daughter is such a lil cutie!! haha shes under the table

LOL Yeah she wouldn't stop going under it...... :p
So I made the table then started to build the enclosure right on the top... I'm actually almost done. I should be done by tonight. I'm getting there. :)
It has just been a HUGE pain in the you know what.... My hubby thinks it is to big BUT I told him once I build this it will be A LONGGGGGG time before I need to make them another enclosure... He doesn't like it BUT it isn't what he wants. I told him I'm making it and having it there. I'm not even done with it. I'm going to be painting this enclosure too. So this looks like crap now BUT once I'm done with it, it will look great. I'm proud of myself doing all of this by myself. Only thing he needed to hlp me with was the big legs that needed to go on the table. Other then that I did it all myself :)


Ohhhh.... Also I put those little wash cloths down at the bottom of the tables because I got the WRONG sizes of those soft pads that go under the tab that doesn't scratch the floors. Forgot what they are called LOL SORRY :p
So once I go back to the store I'll get the right ones. I'm just sick of seeing the ppl at Home-Depot & going there LOL Been there like 50 times in 4 days so I'm going to wait :p
 

immayo

Well-Known Member
5 Year Member
Joined
Dec 7, 2012
Messages
986
Location (City and/or State)
Mesa, AZ
Just an fyi you will need to seal the wood and/or put a plastic barrier at the bottom of the enclosure or it will leak water. Also, depending on what you use to do this and when you paint it you'll need to let it dry for about a week to prevent the toxins from harming your torts.
 

ILoveTortoises2

Member
5 Year Member
Joined
Jul 18, 2013
Messages
479
Location (City and/or State)
Mansfield, Ma
immayo said:
Just an fyi you will need to seal the wood and/or put a plastic barrier at the bottom of the enclosure or it will leak water. Also, depending on what you use to do this and when you paint it you'll need to let it dry for about a week to prevent the toxins from harming your torts.

Up I got some stuff to fill it in & to put at the bottom. I was going to leave it dry for longer then a week. Don't want my little babies getting sick from the toxins
 

ILoveTortoises2

Member
5 Year Member
Joined
Jul 18, 2013
Messages
479
Location (City and/or State)
Mansfield, Ma
Ok so I'm ALMOST done.... I got all of it done except the doors that I will be doing later today because my father in law will have to cut the plastic glass about a half inch to an inch off to fit just right.
I also need get a piece of wood to go across the top where I can put the brackets so that the doors will open better.

As you see I did go over board with the brackets inside the enclosure BUT I wanted to make sure it stayed together & be sturdy :p
Just making sure it stays together LOL :D

So what I will be doing is staining the outside & putting about 2 to 4 coats to make sure it is WATERPROOF :p

So in the photos you will see it half way done then the top is all done too. So when I get it ALL done, waterproofed & everything else I will post some more photos :)


OH and if you look in the top of the inside of the enclosure you will see there is about an inch of nothing there. This will be good for the air to flow in & to put cords right threw there so I don't have to make holes on the side of the enclosure. I might block the sides off with a piece of wood so ONLY that back is closed off....
 

Attachments

  • 100_1950.JPG
    100_1950.JPG
    1.3 MB · Views: 142
  • 100_1955.JPG
    100_1955.JPG
    938.5 KB · Views: 129
  • 100_1956.JPG
    100_1956.JPG
    1 MB · Views: 150
  • 100_1957.JPG
    100_1957.JPG
    1.1 MB · Views: 131
  • 100_1959.JPG
    100_1959.JPG
    1.4 MB · Views: 165
  • 100_1962.JPG
    100_1962.JPG
    1.2 MB · Views: 140
  • 100_1963.JPG
    100_1963.JPG
    824.3 KB · Views: 155

ILoveTortoises2

Member
5 Year Member
Joined
Jul 18, 2013
Messages
479
Location (City and/or State)
Mansfield, Ma
OK so I have been going crazy the past few days with putting my enclosure together. Even my hubby was going crazy at times. :p
Just because I needed to go out or my hubby had to go out to get something we forgot. I swear I have been to Home-Depot about 50 times within a little over a week. So yeah I have been going crazy. LOL :p

So anyways....... I have finish building the enclosure. NOW before you start staining, ect make sure you put a HUGE piece of plastic or whatever you want to use. Then wipe the project down with a wash cloth so that there is nothing from when you sanded the project or anything else. If you don't do this it won't look right and might have clumps of stuff on it.... Make sure you have gloves too. You don't want this stuff on your hands. :)
I started off with wood conditioner so that when I stain the wood there won't be blotches of the stain on the wood. It is VERY important to do this IF you want the stain to look EVEN.... Then I put the stain on. I picked black stain like I said in my last message on here the reason why I have black stain. I MIGHT go back and get a DARK BROWN color BUT I don't know yet... Then wipe down ALL the extra stain left behind with a wash cloth. After I stain I will let this dry. Then of course my FAVORITE part.... I'm going to put some designs on this. So you will need a sponge cut it in a few pieces like shown in the photo. I also have littler paint brushes if need be... I got a few different stencils so I can put a few different things on my project. I want it to look cute. I'm going to give it some what of a jungle feeling. IF I come up with something else then GREAT. I'm going with the flow. :)
After your done with EVERYTHING then you put the finish coat on. I picked EXTRA Gloss because I LOVE my furniture glossy :)
So after your first coat has dried you will feel these raised bumps. You need to LIGHTLY sand your project so that these bumps will go away. Then repeat..... You can do as many coats as you want till your happy.... Lastly I'll be putting my plastic glass doors on. I'm doing this last so I do NOT get any stain, paint, gloss ect on them.....

Here are some photos of my project all built. Then here are the items I used to do the rest of my enclosure. :)
HOPE this helps ppl... I will show the FINISHED photo after I'm ALL done with it.... :)
 

Attachments

  • 100_1987.JPG
    100_1987.JPG
    1 MB · Views: 165
  • 100_1999.JPG
    100_1999.JPG
    1.1 MB · Views: 124
  • 100_2003.JPG
    100_2003.JPG
    1.3 MB · Views: 123
  • 100_2004.JPG
    100_2004.JPG
    1.2 MB · Views: 127
  • 100_2006.JPG
    100_2006.JPG
    1.8 MB · Views: 125
  • 100_2007.JPG
    100_2007.JPG
    1 MB · Views: 118
  • 100_2010.JPG
    100_2010.JPG
    1.7 MB · Views: 130

ILoveTortoises2

Member
5 Year Member
Joined
Jul 18, 2013
Messages
479
Location (City and/or State)
Mansfield, Ma
Timjb97 said:
Well done!!

Thank you... I'm actually done staining my enclosure. Now I'm doing the designs. I'm going to post photos of it all stained before I did the designs I want to do on it. I'll post photos soon :)
 
Status
Not open for further replies.

New Posts

Top